dojo.provide("org.example.workitems.providers.SeverityTagValueSet");

dojo.require("com.ibm.team.workitem.api.common.WorkItemAttributes");
dojo.require("dojo.string");

(function() {
var WorkItemAttributes= com.ibm.team.workitem.api.common.WorkItemAttributes;

dojo.declare("org.example.workitems.providers.SeverityTagValueSet", null, {

    getValueSet: function(attributeId, workItem, configuration) {

        var tags= workItem.getValue(WorkItemAttributes.TAGS);
        var severityOptions= [];

        if (tags.indexOf("important") === -1) {
            severityOptions.push("severity.literal.l1"); // Unclassified
            severityOptions.push("severity.literal.l2"); // Minor
            severityOptions.push("severity.literal.l3"); // Normal
        }

        severityOptions.push("severity.literal.l4"); // Major
        severityOptions.push("severity.literal.l5"); // Critical
        severityOptions.push("severity.literal.l6"); // Blocker

        return severityOptions;
    }
});
})();
Attribute customization is a way to add additional behavior for an attribute of a work item. For example you might want to validate the value of an attribute or even calculate its value based on other attributes. This article discusses in detail all available types of attribute customization. The examples on this page have been developed and tested with RTC version 3.0.1.
This Wiki page is not a tutorial and is meant to serve as a reference. Please see Customizing attributes in RTC 3.0 for a step-by-step introduction on attribute customization where the general concepts are explained and a few examples are provided. Here you can find more details about each possible customization together with further examples. This Wiki also contains information about using scripts to achieve more advanced behavior.
Customizing attributes
Whenever you want to customize the behavior of an attribute you need to perform three steps in the Process Configuration:
- Create a new instance of an attribute customization Each customization instance has a name that you can choose. The instance will belong to a specific customizationCategory and will implement a specific customization Type within that category. Types and categories are discussed below.
- Configure the new customization instance Each customization instance can be configured. You can configure most built-in customizations using the Eclipse UI, just after they are created. Script-based customizations can be configured in the Process Configuration Source. Some customizations do not need to be configured.
- Apply a customization instance to a work item attribute After a customization is created you can apply it to any work item attribute that has a supported type. Simply edit the attribute in the Process Configuration UI and specify what customizations it should use. The Customization Categories section provides information about the compatibility of attribute types and customization categories.
Each customization has three important characteristics:
- Category The category is used as a high-level classification of customizations. There are five possible categories: Default values, Calculated Values, Value sets, Validators and Conditions.
- Type A type is a specific customization implementation. Within each category there are different types of customizations.
- Applicability An attribute customization can only be applied to specific attribute types.
RTC provides a number of built-in customizations which can be easily configured from the Eclipse UI. To allow for more flexibility you can also implement new customizations written in Javascript and Java.
Using scripts for attribute customization
This section contains general information about using scripts for attribute customization. The next section discusses specific customization categories, including details for non-script and script-based implementations. You can find more examples of Javascript customizations in the Attribute Customization Examples Wiki.Configuring a script-based customization by attaching a Javascript implementation
To use scripts deployed as process attachments you need to enable this functionality:- Go to administrative page of your RTC server
https://your.server.name:9443/ccm/admin. - Open the Server tab.
- From the left side-bar open Configuration > Advanced Properties
- In the Work Item Component find the Enable Process Attachment Scripts property and set its value to
true.
Alternatively you can add the following line to
teamserver.properties:# Allow to use scripts deployed as process attachments com.ibm.team.workitem.process.scripts.enabled=true
The configuration interface for a Script-based customization is the same for all customization categories:

You must provide the local path to the Javascript file that implements the custom behavior.
API for Javascript
The API that is used with Script-based attribute customization is very simple. Scripts are implemented as Dojo classes which contain at a minimum a single function with three arguments:- The name of the function and the return type depend on the specific customization:
Customiztion Function name Return type Default value getDefaultValueany type that is compatible with the type of the target attribute Calculated value getValueany type that is compatible with the type of the target attribute Value set getValueSetarrayValidator validatecom.ibm.team.workitem.api.common.StatusCondition matchesboolean - The three input arguments are always the same (except for Conditions which do not have an
attributeIdargument):attributeIdA string that represents the id of the attribute for which this customization has been setworkItemAn instance of a work item for which this script is being executed. This supports the following operations:getValue(String attributeId)returns the value of the attribute with the specified id.getLabel(String attributeId)(since 3.5, to get the label of an enumeration literal)isAttributeSet(String attributeId)returns a boolean value that indicates whether the specified attribute is set for the current work item.
configurationthe configuration of this customization. It supports the following operations:getChild(String name)returns the sub-element of configuration with the specified name. This sub-element has the same interface asconfiguration.getChildren(String name)returns an array of all sub-elements of the configuration with the specified name. Each sub-element has the same interface asconfiguration.getString(String name)returns the value of the configuration attribute with the specified name.getStringDefault(String name, String default)returns the value of the configuration attribute with the specified name. If the specified attribute does not exist this function will return the value specified bydefault.- since 3.next M1
getWorkflowAction()returns a string that is the id of a workflow action currently selected by the user. This action will be executed when the item is saved. If the user has not selected any action this method will returnnull. Note: This method works only when used inside a Condition script, the return value will always benullwhen this is used in other customization script types.
- Only values of the following attribute types can be safely read by and returned from scripts:
- Short String
- Medium String
- Large String
- Integer
- Long
- Boolean
- Timestamp as an ISO-8601 standard string. Use
dojo.date.stampto convert a JavascriptDateobject to and from an ISO-8601 string. When converting aDateobject to a string set themillisecondsand thezuluoptions to true.- To convert the value of a timestamp attribute with the id
attributeIdto aDateobject use:var date= dojo.date.stamp.fromISOString(workItem.getValue(attributeId)); - To convert a Date object to an ISO-8601 string use:
var string= dojo.date.stamp.toISOString(date, {milliseconds:true, zulu:true});
- To convert the value of a timestamp attribute with the id
- Limited support for Enumeration. See the Working with Enumerations section for more information about using Enumerations in scripts.
- Limited support for Items
Currently there is no dedicated API to work with Items or Enumerations and scripts can only use the id of such attributes. If you need additional information, such as the name that corresponds to an Enumeration literal id, you can pass it to scripts using configuration parameters. See the Configuring additional script parameters section for more information.
API Example
Here is an example of how to use the input arguments to access the current work item and the configuration:dojo.provide("org.example.workitems.providers.APIExample"); dojo.require("com.ibm.team.workitem.api.common.WorkItemAttributes"); (function() { var WorkItemAttributes= com.ibm.team.workitem.api.common.WorkItemAttributes; dojo.declare("org.example.workitems.providers.APIExample", null, { getValue: function(attributeId, workItem, configuration) { var result= "Attribute ID: " + attributeId; result+= " item type: " + workItem.getValue(WorkItemAttributes.TYPE); var greeting= configuration.getChild("greeting"); result+= " greeting: " + greeting.getString("first") + greeting.getString("second"); var numbers= configuration.getChild("numbers"); result+= " numbers: " + numbers.getStringDefault("a", "N/A") + numbers.getStringDefault("b", "N/A"); return result; } }); })();
Configuring additional script parameters
The example script above shows how you can gain access to the configuration parameters of the customization. In this case these are the greeting and the numbers. Any script-based customization that requires additional parameters in order to work correctly needs to be configured. Currently only the script file of such customizations can be configured via the UI. You must specify other parameters manually in the Process configuration source. You can configure each customization globally or locally:- The Global configuration is set at the location where the customization provider is defined.
<configuration-data final="false" id="com.ibm.team.workitem.configuration.providers" xmlns="http://com.ibm.team.workitem/providers">
    <defaultValueProviders>
        ...
    </defaultValueProviders>
    <valueSetProviders>
        ...
    </valueSetProviders>
    <conditions>
        ...
    </conditions>
    <validators>
        ...
    </validators>
   <valueProviders>
        ...
    </valueProviders>
</configuration-data>
The global configuration includes at a minimum the name of the script file to run. Optionally it includes other parameters that the script requires. See below for an example. - The Local configuration is set at the attribute definition that includes the customization:
<attributeDefinition id="customizedattribute" name="CustomizedAttribute" type="smallString">
    <defaultValueProvider>
        ...
    </defaultValueProvider>
    <valueSetProvider>
        ...
    </valueSetProvider>
    <validator>
        ...
    </validator>
   <valueProvider>
        ...
    </valueProvider>
</attributeDefinition>
The local configuration includes at a minimum the id of the customization used. Optionally you can include additional elements to parametrize the customization for the current attribute. If an element appears both in the Global and in the Local configuration, the one from the Local configuration will be used.
This is the global configuration of the customization for the script example above:
<valueProvider id="apiexample" name="APIExample" providerId="com.ibm.team.workitem.shared.common.internal.valueProviders.ScriptAttributeValueProvider">
    <script class="org.example.workitems.providers.APIExample" path="/workitem/scripts/common/APIExample.js"/>
    <greeting first="Hello" second="World"/>
    <numbers a="42"/>
</valueProvider>
The top-level element (
valueProvider in this case) and the script element are created by the UI when a new script-based customization is created. If needed you can add any number of additional configuration elements. The example above includes an extra greeting element with two values first and second and one additional element - numbers with the attribute a. Using the API shown above, you can access the values of the attributes defined here from within the script file that implements this customization.
If you try out the above example and associate this Calculated value customziation with a string attribute, the value of that attribute will be similar to:
Attribute ID: someattribute item type: defect greeting: HelloWorld numbers: 42N/AFurthermore you might additionally specify a different greeting locally in the attribute specification:
<attributeDefinition id="someattribute" name="someAttribute" type="smallString">
   <valueProvider id="apiexample" >
       <greeting first="Bye" second="Bye"/>
    </valueProvider>
</attributeDefinition>
If set, this new greeting will be preferred to the one configured in the global customization definition. In this case the value of the attribute will be similar to:
Attribute ID: someattribute item type: defect greeting: ByeBye numbers: 42N/A
Accessing built-in attributes of the work item
The examples above use thecom.ibm.team.workitem.api.common.WorkItemAttributes class which contains the the string constants that are used to access built-in attributes of work items. Here are all possible values:WorkItemAttributes.SEVERITYWorkItemAttributes.PRIORITYWorkItemAttributes.FOUND_INWorkItemAttributes.IDWorkItemAttributes.TYPEWorkItemAttributes.PROJECT_AREAWorkItemAttributes.SUMMARYWorkItemAttributes.STATEWorkItemAttributes.CREATORWorkItemAttributes.OWNERWorkItemAttributes.DESCRIPTIONWorkItemAttributes.CREATION_DATEWorkItemAttributes.RESOLUTIONWorkItemAttributes.DUE_DATEWorkItemAttributes.ESTIMATEWorkItemAttributes.CORRECTED_ESTIMATEWorkItemAttributes.TIME_SPENTWorkItemAttributes.FILED_AGAINSTWorkItemAttributes.PLANNED_FORWorkItemAttributes.RESOLVERWorkItemAttributes.RESOLUTION_DATEWorkItemAttributes.TAGSWorkItemAttributes.MODIFIEDWorkItemAttributes.MODIFIED_BY
Accessing an item's Status attribute
UsingworkItem.getValue(WorkItemAttributes.STATE) you can gain access to an item's workflow state. The value that you receive depends on the state id that is specified in the process configuration. The following rules apply:- If the state id is of the form
s###where ### is an integer value,getValue()will return a string representation of the integer value. For example by default the Verified state has the ids4. Therefore when usinggetValue()the result will be the string"4". - If the state id is of a different form it will be directly returned by
getValue().
This distinction is necessary to support legacy applications.
Working with Enumerations
An enumeration is a special attribute type that allows an attribute to have one of a fixed predefined set of values called literals. When you define an enumeration you specify a name for each literal. Internally each literal is assigned a literal id. You can also manually configure this id in the process specification. When working with enumerations inside an attribute customization script you should use the literal ids to refer to literals and not their names. To see what the id for a literal is, open the process configuration source XML and look for the enumeration definition. Here is, for example, the configuration of the Severity enumeration:<enumeration attributeTypeId="severity" name="Severity"> <literal icon="processattachment:/enumeration/unassigned2.gif" id="severity.literal.l1" name="Unclassified"/> <literal icon="processattachment:/enumeration/minor.gif" id="severity.literal.l2" name="Minor"/> <literal default="true" icon="processattachment:/enumeration/normal.gif" id="severity.literal.l3" name="Normal"/> <literal icon="processattachment:/enumeration/major.gif" id="severity.literal.l4" name="Major"/> <literal icon="processattachment:/enumeration/critical.gif" id="severity.literal.l5" name="Critical"/> <literal icon="processattachment:/enumeration/blocker.gif" id="severity.literal.l6" name="Blocker"/> </enumeration>
By default each literal id will be of the form
EnumerationName.literal.l#where
# is a number that uniquely identifies the literal.
You might want to manually specify the literal ids for enumerations which are used in scripts to make them easier to understand. However you should only change the literal ids immediately after you create an Enumeration. After an Enumeration has been used, any changes to the literal ids will not be reflected in existing work items and their stored attributes will contain invalid data.
Customization Categories
Default values
A default value customization can be used to provide an initial value for an attribute when creating a new work item. Below is a list of all Default Value customizations that you can configure using the Eclipse client:| Customization type | Applicable to attributes of type |
|---|---|
| Single-Line Text | Small String, Medium String |
| Multi-Line Text | Large String |
| Single-Line HTML | Medium HTML |
| Multi-Line HTML | Large HTML |
| Wiki | Wiki |
| Iteration | Interval |
| Category | Category |
| User | Contributor |
| User List | Contributor List, Subscriptions |
| Number | Integer, Long |
| Role Based Enumeration Default | Enumeration |
| Operating System | Enumeration |
| Script Based Default | Any attribute type |
You can configure all of these types (except Operating System and Script Based Default) using the Eclipse UI, by simply providing a fixed value to use. Here is a screen shot of the configuration UI for a default value of type Multi-line Text:

Operating System default value
You can use this customization whenever an enumeration attribute should be initialized with a literal corresponding to the operating system that the Eclipse client is using.
WARNING: A default value configured with this customization will only work if an item is created using the Eclipse client.
For this customization to work correctly you need to configure it in the project XML.
First, create an Operating System enumeration:
<enumeration attributeTypeId="operatingsystem" name="Operating System">

    <literal default="true" id="operatingsystem.literal.windows" name="Windows"/>

    <literal id="operatingsystem.literal.linux" name="Linux"/>

    <literal id="operatingsystem.literal.macosx" name="Mac OS X"/>

</enumeration>
For more information about enumerations see the Working with Enumerations section
Next, create the Operating system customization and configure it for the specific Enumeration. A mapping is needed from operating system identification strings to literals of the enumeration. Here is an example:
<defaultValueProvider id="OSDefault" name="OS" providerId="com.ibm.team.workitem.common.internal.attributeValueProviders.OSLiteralProvider">

<mapping>

    <value content="windows">
        <literal id="operatingsystem.literal.windows" />
    </value>
    <value content="linux">
        <literall id="operatingsystem.literal.linux" />
    </value>
    <value content="macosx">
        <literall id="operatingsystem.literal.macosx" />
    </value>
</mapping>

</defaultValueProvider>
The operating system identification string ( the
content attribute in the example above ) depends on the operating system on which the Eclipse client is running. This string is the value returned by the org.eclipse.core.runtime.Platform.getOS() method. The literal id in the mapping above must correspond to a literal id of the Operating system enumeration. If such a correspondence is found, the value of that literal will be used as a default. Otherwise the default value for the enumeration will be used (Windows in the example above).Script-based default values
Note: You can find general information about script-based attribute customization in the Using scripts for attribute customization section.
If you want to use a custom script in order to provide a default value, simply add a new Script Based Default customization and type the file name of the JavaScript file implementing the script. To write your script use the skeleton below:
dojo.provide("com.example.common.MyClass");

(function() {
dojo.declare("com.example.common.MyClass", null, {

    getDefaultValue: function(attribute, workItem, configuration) {

        var value = ... //Some code that computes a return value
        return value;

    }

});
})();
Here is an example that simply returns the name of the current week day:
dojo.provide("com.example.common.CurrentDay");

(function() {
dojo.declare("com.example.common.CurrentDay", null, {

    getDefaultValue: function(attributeId, workItem, configuration) {

        var day = ( new Date() ).getDay();
        var dayName = "Unknown day";

        if (day == 0) dayName =  "Sunday";
        else if (day == 1) dayName =  "Monday";
        else if (day == 2) dayName =  "Tuesday";
        else if (day == 3) dayName =  "Wednesday";
        else if (day == 4) dayName =  "Thursday";
        else if (day == 5) dayName =  "Friday";
        else if (day == 6) dayName =  "Saturday";

        return dayName;
    }
});
})();
Calculated values
You can use this customization if the value of an attribute must be calculated instead of entered by the user. Optionally the calculated value can depend on the value of other attributes of the same work item. An attribute configured with a calculated value customization should use a read-only presentation. Here are all Calculated Value customizations that you can configure using the Eclipse client:| Customization type | Applicable to attributes of type |
|---|---|
| Exposure Provider | These customizations are designed for special case usage in project areas based on the Formal Project Template and depend on specific attributes defined there. These customizations are preconfigured in that template and can not be used outside of it. |
| Probability Cost Provider | |
| Script Based Calculated Value | Any attribute type |
Script-based calculated values
Note: You can find general information about script-based attribute customization in the Using scripts for attribute customization section.
If you configure a Script-based calculated value, the script will be executed in two cases:
- When a work item is saved, the script is executed to recalculate the value.
- When an attribute which the current attribute depends on is changed, the value of the current attribute is recalculated. Depending on the presentations of the two attributes this may not work in all cases.
Here is a skeleton for a script that implements a calculated value customization:
dojo.provide("org.example.workitems.providers.CalculatedValueSkeleton");

(function() {
dojo.declare("org.example.workitems.providers.CalculatedValueSkeleton", null, {

    getValue: function(attributeId, workItem, configuration) {
        return 42;
    }
});
})();
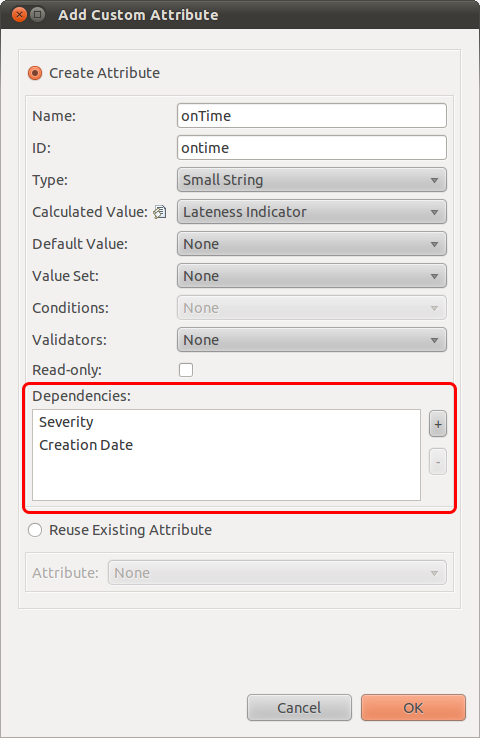
And here is an example script that returns an "on-time" status of a work item. Items which are more critical have tighter deadlines and thus will be labelled as late or very late after shorter periods following their creation.
dojo.provide("org.example.workitems.providers.LatenessIndicator");

dojo.require("com.ibm.team.workitem.api.common.WorkItemAttributes");
dojo.require("dojo.date");
dojo.require("dojo.date.stamp");

(function() {
var WorkItemAttributes= com.ibm.team.workitem.api.common.WorkItemAttributes;

dojo.declare("org.example.workitems.providers.LatenessIndicator", null, {

    getValue: function(attributeId, workItem, configuration) {

        // Get the creation date and the current date and compute the difference in days.
        var creationDate= dojo.date.stamp.fromISOString(workItem.getValue(WorkItemAttributes.CREATION_DATE));
        var currentDate= new Date();
        var dayDiff= dojo.date.difference(currentDate, creationDate, "day");

        // Return a string that indicates whether the completion of this work item is on time
        // or not based on its severity and how much time has passed since it was created.
        var severity= workItem.getValue(WorkItemAttributes.SEVERITY);
        if ((severity === "severity.literal.l6")) { // Blocking severity
            if (dayDiff < 7) return "on time";
            else if (dayDiff < 30) return "late";
            else return "very late";
        } else if ((severity === "severity.literal.l5")) { // Critical severity
            if (dayDiff < 14) return "on time";
            else if (dayDiff < 45) return "late";
            else return "very late";
        } else if ((severity === "severity.literal.l4")) { // Major severity
            if (dayDiff < 30) return "on time";
            else if (dayDiff < 90) return "late";
            else return "very late";
        } else {
            if (dayDiff < 90) return "on time";
            else if (dayDiff < 180) return "late";
            else return "very late";
        }
    }
});
})();
Note: The example above uses the Severity Enumeration. You can find more information about using Enumerations in scripts in the Working with Enumerations section. To make this script reusable in different situations you can pass the enumeration ids as configuration parameters as explained in the Configuring Scripts with additional parameters section.
If the value of an attribute is calculated based on the value of other attributes it is important that you specify these dependencies in the attribute configuration:
Value sets
You can use a value set customization to determine a set of values that can be assigned to an attribute. Here are all Value set customizations that can be configured using the Eclipse client:| Customization type | Applicable to attributes of type |
|---|---|
| Dependent Enumerations | Enumeration |
| Role Based User List | Contributor |
| Script Based Value Set | Any attribute type |
Dependent Enumerations (3.0.1)
You can use this customization if the set of possible values for an attribute depends on another attribute. Both attributes must be of type Enumeration. You use the configuration UI to specify the source and dependent enumerations. There you indicate what dependent values are available for each value of the source enumeration.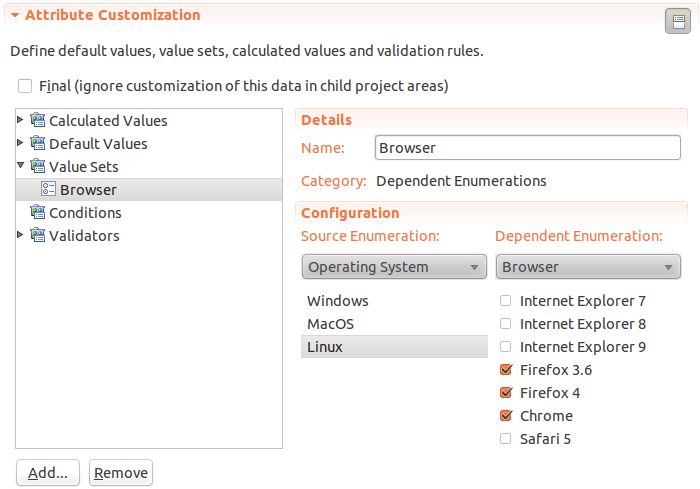
When applying this customization to an attribute it is important to indicate a dependency on the attribute that defines the source enumeration:

Dependent Enumerations (3.5)
In RTC 3.5 the support for dependent enumerations was greatly improved to be more powerful. To make it easier to configure large enumerations, Default Values have been introduced so that you can specify the default value set that an enumeration should have in case the value of an attribute is not specifically configured. Another addition is support for non-enumeration Attribute Dependencies. With RTC 3.5 any work item attribute can serve as value set provider for an enumeration. And finally with the help of Dynamic Hierarchies, a work item attribute that has a hierarchical structure (like Categories, Iterations and Team Areas) can be configured to provide values for an enumeration if the value is selected or any of the child values.
In the following parts of this document you will find instructions how to configure each of the new features. The instructions also outline the process specification XML to assist with attributes that are not providing a configuration UI.
Default Values (UI)
Simply select the default entry on top in the list of entries and configure the values.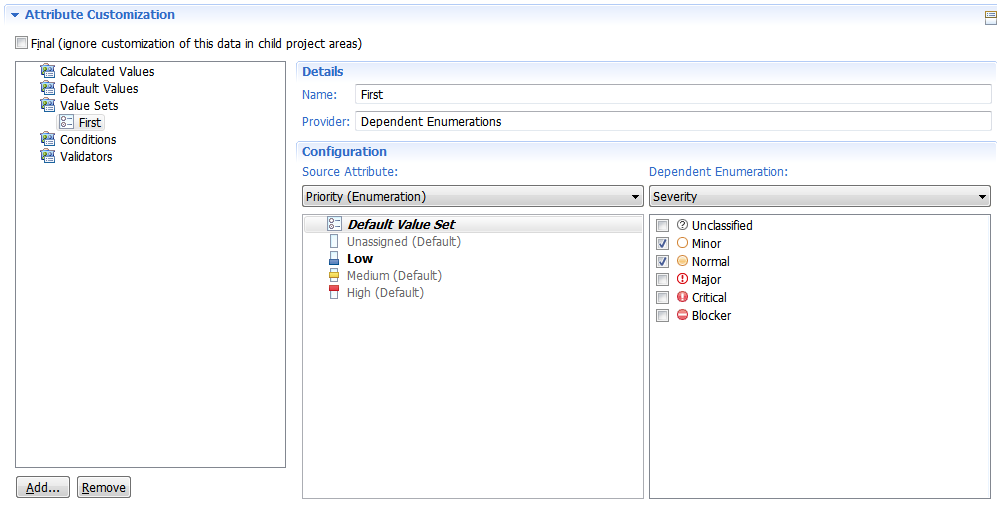
Default Values (XML)
Configuring default values for an enumeration is simple. Just leave out thecontent attribute of the value XML element and the provided literals will be used as value set in case the attribute matches a value that is not configured otherwise.Attribute Dependencies (UI)
Simply select any desired attribute from the list in "Source Attributes". Currently a configuration UI is provided for all enumerations, "Filed Against", "Found In", "Planned For", "Status", "Resolution", "Team Area" and "Type".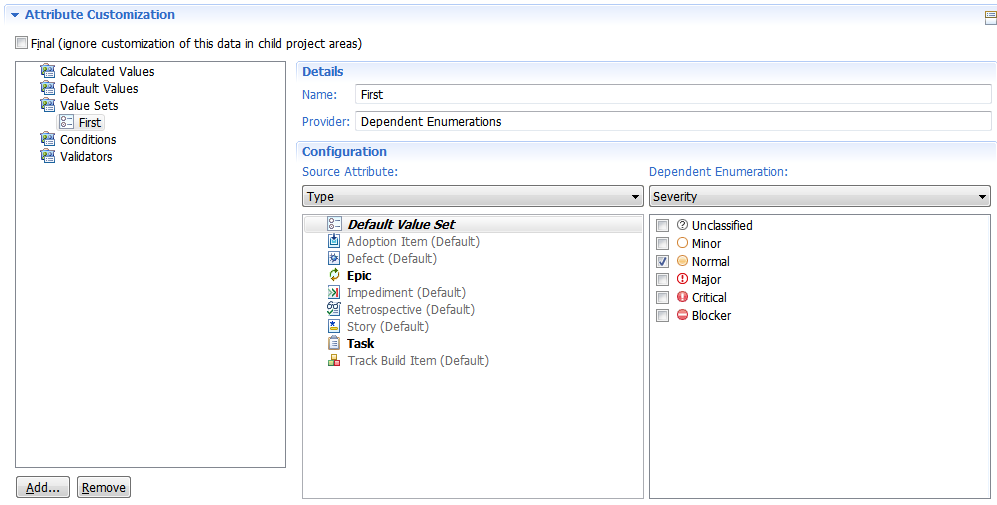
Attribute Dependencies (XML)
You can now configure any work item attribute to be the provider of values to an enumeration. Simply put the attribute type identifier as value into thesourceEnumeration attribute of themapping XML element to specify the attribute you want to use as source. For example, you can use interval for the "Planned For" attribute, category for the "Filed Against" attribute orsmallString for any string based attribute like "Status". Second, inside the content attribute of the value XML element, place the item identifier. For item based attributes like "Planned For", use the UUID of the iteration. For string based attributes like "Status", use the actual value (e.g. identifier of the Status as defined by the workflow).
If you want to configure an enumeration that depends on the Team Area a work item is filed against, use
com.ibm.team.workitem.teamArea as value for the mapping XML element. And for thecontent attribute of the value XML element, simply use the item UUID of the team area.
Do not forget to configure the attribute dependency in the "Types and Artifacts" editor. An enumeration attribute has to list all its dependencies in order to update its value properly.
Dynamic Hierarchies (UI)
Dynamic hierarchies can be configured for the attributes "Planned For", "Filed Against" and "Team Area". Simply open the context menu on any node with children and choose to include children for the value set.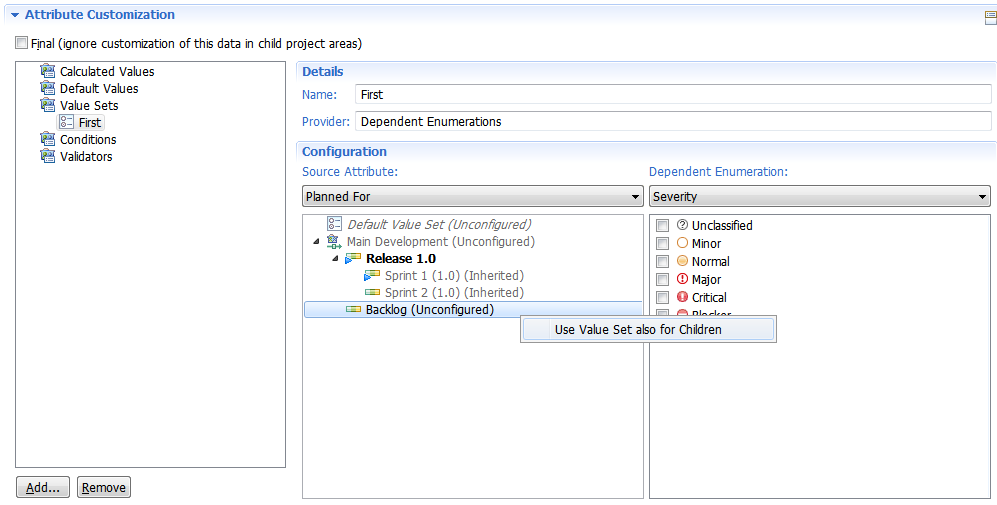
Dynamic Hierarchies (XML)
Some work item attributes support hierarchies. Categories, Iterations and Teams can have a hierarchy and often you might want to configure a value set for an enumeration for a specific attribute value and all child values that are configured. Think about an iteration that is divided into several child iterations for your release. You might want to configure a value set that is returned whenever either the parent iteration or any of its children is selected in the work item editor.
To configure a specific attribute value to match including all child values, add the attribute
includeChildren with a value of true to the value XML element that provides the value set. For thecontent attribute of the value XML element, use the UUID of parent item you want to match on.Role Based User List
You can use this customization with an attribute of type Contributor in order to limit the choice of users. Only users which have the specified roles within the team can be assigned to the attribute: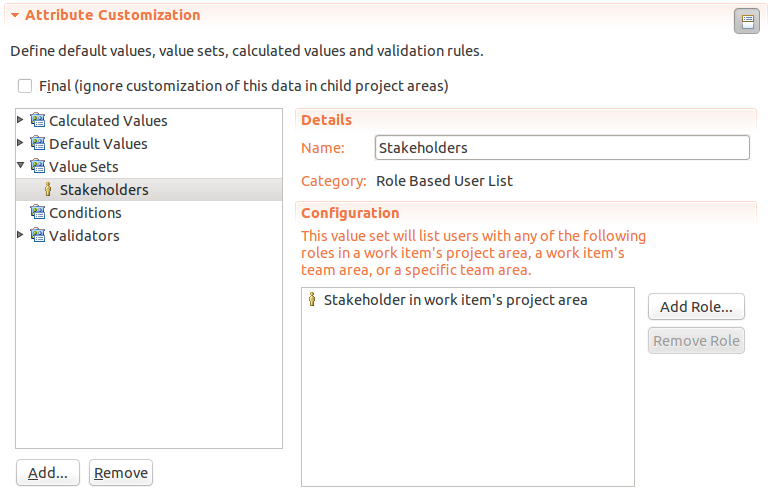
Script Based Value Set
Note: You can find general information about script-based attribute customization in the Using scripts for attribute customization section.
You may provide custom value sets using scripts. Values which are permitted for an attribute must be explicitly included in the returned value set.
Here is a skeleton for implementing Value set providers using a script:
dojo.provide("org.example.workitems.providers.ValueSetSkeleton");

(function() {
dojo.declare("org.example.workitems.providers.ValueSetSkeleton", null, {

    getValueSet: function(attributeId, workItem, configuration) {
        var result= [];
        result.push("a");
        result.push("b");
        return result;
    }
});
})();
Here is an example that defines which Severity levels are available based on the tags of a work item. If the work item is tagged as important, only the Major, Critical and Blocker severities can be specified for this item. If it is not tagged as important all severity levels are enabled:
dojo.provide("org.example.workitems.providers.SeverityTagValueSet");

dojo.require("com.ibm.team.workitem.api.common.WorkItemAttributes");
dojo.require("dojo.string");

(function() {
var WorkItemAttributes= com.ibm.team.workitem.api.common.WorkItemAttributes;

dojo.declare("org.example.workitems.providers.SeverityTagValueSet", null, {

    getValueSet: function(attributeId, workItem, configuration) {

        var tags= workItem.getValue(WorkItemAttributes.TAGS);
        var severityOptions= [];

        if (tags.indexOf("important") === -1) {
            severityOptions.push("severity.literal.l1"); // Unclassified
            severityOptions.push("severity.literal.l2"); // Minor
            severityOptions.push("severity.literal.l3"); // Normal
        }

        severityOptions.push("severity.literal.l4"); // Major
        severityOptions.push("severity.literal.l5"); // Critical
        severityOptions.push("severity.literal.l6"); // Blocker

        return severityOptions;
    }
});
})();
Note: The example above uses the Severity Enumeration. You can find more information about using Enumerations in the Working with Enumerations section.
When configuring an attribute with the above customization the Severity attribute should include a dependency on the Tags attribute.
Validators
A validator can be applied to a work item attribute in order to assure that the value of the attribute fulfils certain conditions. Attributes which have attached validators are checked in three different situations:- In the WebUI when the user is editing the attribute. If the value is invalid an icon will be displayed. This icon can be configured to represent an Error, a Warning or Information Only.
- In the Eclipse client when the user is editing the attribute. Like above an icon is displayed.
- When the work item containing the attribute is saved. This is only true if the behavior of the save operation has been manually configured in Team Configuration, Operation Behavior to require attribute validation. Otherwise attributes are not checked when saved. Furthermore attributes which are not required and are left empty will never be validated.
In all three cases you can configure the validator with a message that is displayed when a value is invalid.
Note: When using a validator for an attribute, you should carefully choose the presentation of the attribute. Some presentations do not show validation results, and users can be confused by the lack of error notifications when an attribute value is invalid. Presentations behave differently in the Eclipse client and the WebUI. The discussion of validators below includes information about suitable editor presentations. No matter what presentation you choose to use, all attribute values will be validated when they are saved on the server if Attribute validation is configured as a precondition for saving in Team Configuration, Operation Behavior.
Here is a summary of all Validator customizations that can be configured using the Eclipse client:
| Customization type | Applicable to attributes of type |
|---|---|
| Number Range | Integer, Long |
| Regular Expression | Small String, Medium String, Large String, Medium HTML, Large HTML |
| Script Based Validation | Any attribute type |
Number Range
You can use this validator in order to restrict the values an attribute may have to a single range, defined by a minimum and a maximum value. You can configure the allowed range using the Eclipse client. In addition you can also configure a message to be displayed when validation fails and a corresponding icon: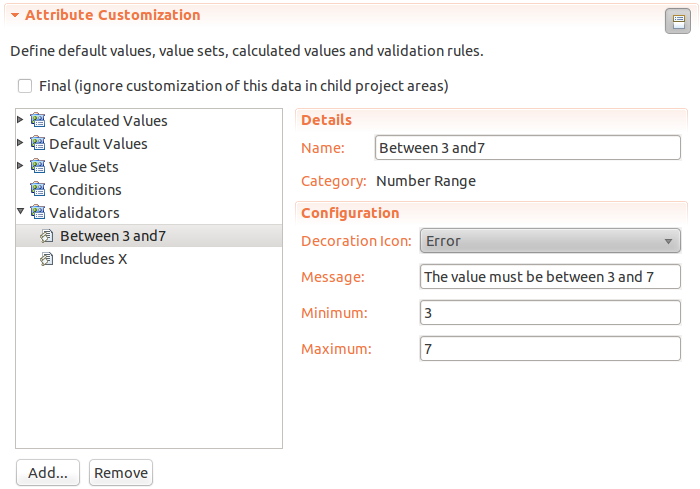
Depending on the type of the validated attribute, you can use different editor presentations. The table below defines the validation behavior for all possible cases.
| NumberRange validator on Integer and Long attribute types | ||
|---|---|---|
| Presentation kind | Integer/Long | String |
| Works in Web UI | ✓ | NO |
| Works in Eclipse | ✓ | NO (can't edit) |
| Works on Save | ✓ | ✓ |
Regular Expression
You can use this validator to require that a string matches a certain regular expression. You can fully configure this validator using the Eclipse client: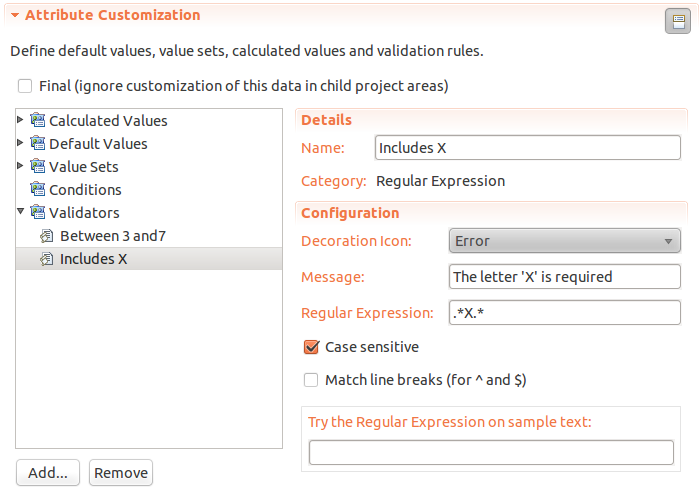
Depending on the type of the validated attribute, you can use different editor presentations. The tables below define the validation behavior for all possible cases.
| RegEx validator on a Medium/Large HTML attribute type | |||||
|---|---|---|---|---|---|
| Presentation kind | Description | HTML | SmallHTML | String | Text |
| Works in Web UI | ✓ (in preview mode) | ✓ (in preview mode) | ✓ | ✓ | NO |
| Works in Eclipse | NO | NO | ✓ (on focus change) | NO (can't edit) | ✓ |
| Works on Save | ✓ | ✓ | ✓ | ✓ | ✓ |
| RegEx validator on a Small/Medium/Large String attribute type | |||||
|---|---|---|---|---|---|
| Presentation kind | Checkbox Multi-select List | Description | Multi-select list | String | Text |
| Works in Web UI | ✓ | ✓ (in preview mode) | ✓ | ✓ | NO |
| Works in Eclipse | ✓ | NO | ✓ | ✓ | ✓ |
| Works on Save | ✓ | ✓ | ✓ | ✓ | ✓ |
Script Based Validation
Note: You can find general information about script-based attribute customization in the Using scripts for attribute customization section.
You can also provide a custom validator using a script. Here is a skeleton for validators:
dojo.provide("com.example.Condition");

dojo.require("com.ibm.team.workitem.api.common.Severity");
dojo.require("com.ibm.team.workitem.api.common.Status");

(function() {

    var Severity = com.ibm.team.workitem.api.common.Severity;
    var Status = com.ibm.team.workitem.api.common.Status;

    dojo.declare("com.example.Condition", null, {

    validate: function(attributeId, workItem, configuration) {

        return new Status(Severity["ERROR"], "Validation failed");
    }
});
})();
A validation script must declare the function
validate which returns a Status object. A status indicates the severity of the validation error and an error message. If the validation passed successfully the OK status should be used:return Status.OK_STATUS;
Possible severity levels are:
Severity["OK"]
Severity["INFO"]
Severity["WARNING"]
Severity["ERROR"]
Here is an example of a validator that makes sure the date specified by one attribute comes after the date specified by another:
dojo.provide("org.example.DateValidator");

dojo.require("com.ibm.team.workitem.api.common.Severity");
dojo.require("com.ibm.team.workitem.api.common.Status");
dojo.require("dojo.date"); // We need the date class from Dojo to compare two dates
dojo.require("dojo.date.stamp"); // We need the stamp class to work with ISO date strings

(function() {
var Severity = com.ibm.team.workitem.api.common.Severity;
var Status = com.ibm.team.workitem.api.common.Status;

var DateValidator = dojo.declare("org.example.DateValidator", null, {

    validate: function(attributeId, workItem, configuration) {

        // Get the configuration parameters about the severity and error message of this validator
        var severity= configuration.getChild("parameters").getStringDefault("severity", Severity.ERROR.name);
        var message= configuration.getChild("parameters").getStringDefault("message", "");

        // Get the begin date attribute from the configuration and make a Date object from it
        var beginDateId = configuration.getChild("parameters").getStringDefault("beginDateAttributeId", "");
        var beginDate = dojo.date.stamp.fromISOString(workItem.getValue(beginDateId));

        // Get the current attribute's value and make a Date object from it
        var endDate= dojo.date.stamp.fromISOString(workItem.getValue(attributeId));

        // Compare the two dates and make sure endDate is not earlier than beginDate
        if (dojo.date.compare(endDate, beginDate) >= 0) {
            return Status.OK_STATUS;
        } else {
            return new Status(Severity[severity], message);
        }
    }
});
})();
You need to configure this script in the Process Configuration Source:
<validator id="dateval" name="Date Validator" providerId="com.ibm.team.workitem.shared.common.internal.valueProviders.ScriptAttributeValueProvider">

    <script class="org.example.DateValidator" path="/workitem/scripts/common/DateValidator.js"/>
    <parameters beginDateAttributeId="startdate" message="The completion date can not be earlier than the start date" severity="ERROR"/>
</validator>
Note: This validator depends on the value of another attribute ("startdate" in this case). It is important that you explicitly set this dependency in the attribute properties for the attribute that uses this validator.
Conditions
Conditions are a special type of customization that is used to dynamically determine required attributes. Conditions are evaluated for an entire work item and if a condition is met any attributes associated with it will be required.
Currently only script-based conditions are supported.
Note: You can find general information about script-based attribute customization in the Using scripts for attribute customization section.
Currently, you can only use conditions to dynamically determine required attributes, but we plan to expand their applicability. The rest of this section will demonstrate how to configure a condition to dynamically determine required attributes. The configuration of this customization consists of two steps:
- In the Attribute Customization section of the process configuration, create a new Condition .
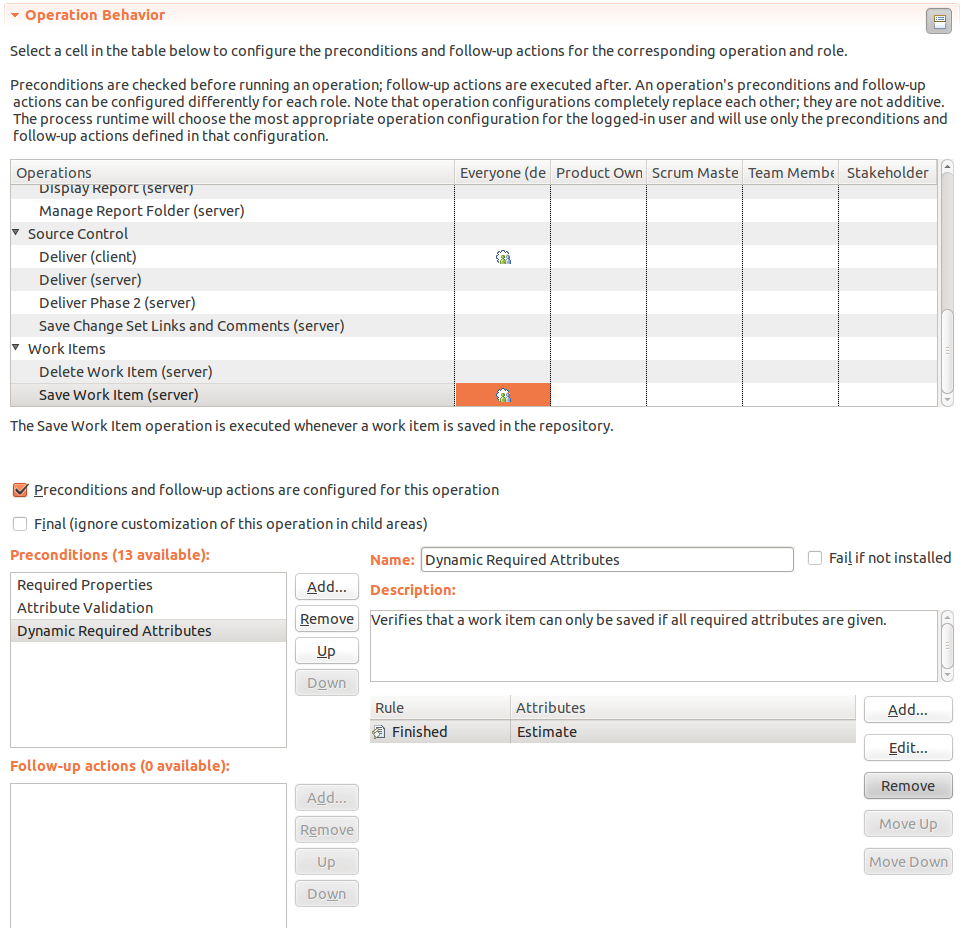
- In the Operation Behavior section of the process configuration, create a pre-condition of type Dynamic Required Attributes. Associate the condition you created with one or more attributes.
Here is a skeleton of a script that implements a condition:
dojo.provide("org.example.workitems.providers.ConditionTest");

(function() {
dojo.declare("org.example.workitems.providers.ConditionTest", null, {

    matches: function(workItem, configuration) {
        return true;
    }
});
})();
Notice that a condition only has two arguments. There is no
attributeId argument since a condition is not associated with any particular attribute.
Here is an example of a condition that is true whenever the state of an item is Resolved or Verified:
dojo.provide("org.example.workitems.providers.FinishedCondition");

dojo.require("com.ibm.team.workitem.api.common.WorkItemAttributes");

(function() {
var WorkItemAttributes= com.ibm.team.workitem.api.common.WorkItemAttributes;

dojo.declare("org.example.workitems.providers.FinishedCondition", null, {

    matches: function(workItem, configuration) {
        var state= workItem.getValue(WorkItemAttributes.STATE);
        console.log(typeof(state))
        return (state === "3" || state === "4"); // Resolved or Verified state
    }
});
})();
You can configure this condition to be checked when saving the work item in order to require that an attribute is set for items which have been completed. The screen shot below contains a Dynamic Required Attributes pre-condition that requires the Estimate attribute whenever the Finished condition is met:
Debugging scripts
Here are a few hints about debugging scripts used for attribute customization.WebUI
By default all scripts sent to the browser are preprocessed for efficiency. This includes combining files, reducing white space and shortening identifier names. The preprocessed Javascript is not suitable for debugging and you can disable it by including the special argument
debug=truein the URL for a web-page. For example:
https://Your.Site.Name:9443/ccm/web/projects/MyProject?debug=true#action=com.ibm.team.workitem.newWorkItem&type=defect&ts=13058802500900
https://Your.Site.Name:9443/ccm/web/projects/MyProject?debug=true#action=com.ibm.team.workitem.viewWorkItem&id=132
Doing this will disable all preprocessing of the Javascript files and will enable tools like Firebug to easily debug scripts inside a web browser. A limitation of this approach is that only validators and calculated values are executed in the browser, the other type of customizations only run on the server.
RTC Server / Eclipse Client
While it is not yet possible to set break points inside of scripts running on the server, it is possible to output messages to the server log. Use the following in your Javascript file:console.log("My message");
The result in the log will be similar to:!ENTRY com.ibm.team.rtc.common.scriptengine 1 0 2011-05-20 10:56:15.980 !MESSAGE LOG: My message
You will find the log entries in these files:
- Server:
JazzTeamServer/server/tomcat/work/Catalina/localhost/ccm/eclipse/workspace/.metadata/.log - Eclipse client:
client/eclipse/workspace/.metadata/.log
Providing new customizations implemented in Java
Note: This is an advanced topic meant for experts users only. If you need to implement your own customization behavior, consider using a script-based approach first.
It is possible to also implement new customizations in Java. The advantages of this approach are that the available Java API has more functionality and that there is better tool support. However there are some major disadvantages. A plug-in that implements a customization needs provisioning for the client and for the server and can not be deployed dynamically. Furthermore customizations implemented using Java do not work in the WebUI.
Consider the following points regarding Java based customizations of different categories:
- Dynamic customizations such as validators and calculated values will only work on the server side and in the Eclipse client. Users of the WebUI will not get immediate feedback if a validation fails or if a calculated value needs to be recomputed. Users of the WebUI will need to first save the current work item and may have to refresh the web page in order for the new values to be visible.
- Default values, value sets and conditions should work fine, as they are executed only on the server side.
Providing a Java based customization consists of the following steps:
- Create a new plug-in that extends the
com.ibm.team.workitem.common.attributeValueProvidersextension point by implementing the desired customization. - Create a feature that contains the plug-in and an update site for this feature.
- Provision the RTC server and Eclipse clients by using the update site containing the new feature.
- Configure attributes to use the new customization. This step is identical with the case of built-in customization.
A step-by-step tutorial about creating a plug-in for RTC and provisioning the server is available here. The following section contains specific details for creating plug-ins that provide attribute customization. Examples of Java based customizations can be found here: Attribute Customization Examples.
Creating a plug-in that contributes an attribute customization
- Create a new Plug-in project:
- An activator is not necessary.
- The project does not use any predefined template.
- Edit the plug-in configuration:
- On the Dependencies tab add the following dependencies:
- Required plug-ins
com.ibm.team.workitem.commoncom.ibm.team.repository.commonorg.eclipse.core.runtime
- Required plug-ins
- On the Extensions tab:
- Add a new extension of type
com.ibm.team.workitem.common.attributeValueProviders. - Right click on the new extension and select New:
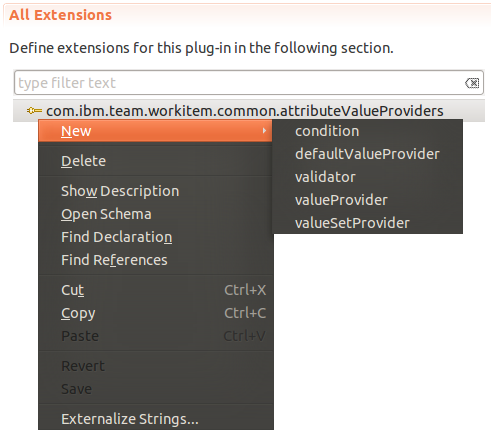
The menu allows you to choose what category your new customization should be created for. Choose one and configure its mandatory attributes:idThe id of this customization.nameThe name of this customization. This is the Type which is displayed when the user chooses a customization within a category.classThe class that will implement this customization.
- Right click on the new customization and select New > attributeType. This allows you to set what attribute types can the new customization be applied to. Possible type ids include:
integerlongsmallStringmediumStringstringmediumHtmlhtmlwikiintervalcontributorcategorycontributorListsubscriptionsenumeration*(any type)
- In the end the configuration should look similar to this:

- Click on the class link to create the new class that will implement this customization. This will create a skeleton that includes all necessary imports and interface references.
- Add a new extension of type
- On the Dependencies tab add the following dependencies:
- Implement the custom functionality that you require in the class that you configured in the plug-in manifest. Here is an example:
package org.example.attributecustomization;

import org.eclipse.core.runtime.IProgressMonitor;

import com.ibm.team.repository.common.TeamRepositoryException;
import com.ibm.team.workitem.common.IWorkItemCommon;
import com.ibm.team.workitem.common.internal.attributeValueProviders.IConfiguration;
import com.ibm.team.workitem.common.internal.attributeValueProviders.IValueProvider;
import com.ibm.team.workitem.common.model.IAttribute;
import com.ibm.team.workitem.common.model.IWorkItem;

public class MyValueProvider implements IValueProvider {

    @Override
    public String getValue(IAttribute attribute, IWorkItem workItem,
            IWorkItemCommon workItemCommon, IConfiguration configuration,
            IProgressMonitor monitor) throws TeamRepositoryException {

        // This example simply returns the name of the attribute as a calculated value
        return attribute.getIdentifier();
    }

}
Provisioning the RTC server
After the plug-in is created the RTC servers needs to be provisioned:- Create a Feature that includes the new plug-in.
- Create a Site that includes the Feature.
- Build the Site. This will create two folders
PluginsandFeaturesand asite.xmlfile. - You need to copy the two folders and the file into a new folder in the server. The new folder's name should be something like
attribute-customization-siteand should be placed in thesitesfolder of your RTC configuration:- For CLM builds this is usually
\server\conf\ccm\sites - For RTC-only builds this usually
\server\conf\jazz\sitesIn the end the folder structure should look like this: server\conf\ccm\sitesserver\conf\ccm\sites\attribute-customization-siteserver\conf\ccm\sites\attribute-customization-site\site.xmlserver\conf\ccm\sites\attribute-customization-site\pluginsserver\conf\ccm\sites\attribute-customization-site\plugins\plugin.jarserver\conf\ccm\sites\attribute-customization-site\featuresserver\conf\ccm\sites\attribute-customization-site\features\feature.jar
- For CLM builds this is usually
- Finally, in order to enable the new update site you need to create a new provision profile file
server\conf\ccm\provision_profiles\attribute-customization-site.ini. Substituteccmwithjazzfor RTC-only installs. The content of the file should be:url=file:ccm/sites/attribute-customization-site featureid=CustomValueProviderFeature
Where the url should point to the relative location of the site folder you created and the featureid should match the ID of the feature you created. - Restart the server. To make sure that it has been provisioned properly go to
https://Your.Server.Name:9443/ccm/admin?showinternal=true#action=com.ibm.team.repository.admin.provisionStatus. Your new feature and plug-in should appear in the log.
Provisioning the Eclipse Client
In order for the new customization to be configurable via the Eclipse client you need to install it first:- Open the Plug-ins installation manager from the menu Help > Install new software...
- Click Add... and then Local.... Open the directory containing the install site you created and click OK.
- From the list select the new feature and finish the installation.
댓글 없음:
댓글 쓰기