2011년 11월 26일 토요일

CLM 설치 - 백업 서버 설정 방법


1. [JTS 셋업 전] 기본 및 백업 서버에 CLM 애플리케이션 배치

1.1 기본 및 백업 서버에 CLM 애플리케이션을 배치

디폴트로 배치를 한 경우에는 Windows의 기본 위치는 C:\Program Files\IBM\JazzTeamServer입니다. AIX 또는 Linux 시스템의 경우 기본 위치는 /opt/IBM/JazzTeamServer입니다.

윈도우 <JazzInstallDir> = C:\Program Files\IBM\JazzTeamServer
AIX 또는 Linux <JazzInstallDir> = /opt/IBM/JazzTeamServer


1.2 기본 서버에서 전체 텍스트 색인의 동일한 위치를 참조하도록 teamserver.properties 파일를 수정

<JazzInstallDir>/server/conf/jts/teamserver.properties 파일 변경
<JazzInstallDir>/server/conf/ccm/teamserver.properties 파일 변경
<JazzInstallDir>/server/conf/qm/teamserver.properties 파일 변경

CLM 설치 - HTTPS 대신 HTTP 설정하기 (WAS)

출처 ; https://jazz.net/library/article/207,http://publib.boulder.ibm.com/infocenter/clmhelp/v3r0m1/topic/com.ibm.jazz.install.doc/topics/t_disable_server_certificates.html

보안인증서 사용 안함
시스템이 설정되고 보안 공용 URI를 사용하는 경우, 서버가 이미 보안 공용 URI를 캐시했으므로 애플리케이션에 대한 보안을 사용 불가능하게 할 수 없습니다. 즉, 설치 마법사를 실행하여 서버를 구성하기 전에 이 지시사항을 실행해야 합니다.


  1. IBM WebSphere® Application Server에 설치된 jts.war 파일에서 web.xml 파일을 수정하십시오. 파일을 검색하려면 우선 .war 파일의 압축을 임시 영역에 푸십시오.
  2. 모든 CONFIDENTIAL을 NONE으로 변경하고 파일을 저장하십시오.
  3. WebSphere Application Server가 실행 중인지 확인하고 https://localhost:9043/ibm/console/logon.jsp로 이동하십시오.
  4. 애플리케이션 > 엔터프라이즈 애플리케이션을 클릭하십시오.
  5. jts_war을 선택하고 업데이트를 클릭하십시오.
  6. 단일 파일 바꾸기 또는 추가를 선택하십시오.
  7. 설치된 애플리케이션 아카이브 파일로 시작하는 경로를 바꾸거나 추가할 파일에 지정 필드에jts.war/WEB-INF/web.xml을 입력하십시오.
  8. 찾아보기를 클릭하고 이전 단계에서 수정한 동일한 web.xml 파일을 선택하십시오.
  9. 다음을 클릭하고 애플리케이션이 저장될 때까지 따르십시오.
  10. Enterprise Applications 패널로 되돌아가서 jts_war 애플리케이션을 중시시킨 후 시작하십시오.
  11. 설치된 다른 애플리케이션(ccm.warqm.warrm.warconverter.waradmin.war 및 clmhelp.war)에 대해 이전 단계를 반복하십시오.
  12. 브라우저를 열고 http://hostname.example.com:9080/jts/setup으로 이동하여 설정 마법사를 계속하십시오. 또한 경로가 https://hostname.example.com:9443/jts/setup으로 재지정되지 않았는지도 확인하십시오.

WAS 싱글 사이온 설정시

WebSphere Application Server Integration Solutions Console에서 다음 단계를 완료하십시오.
  1. 왼쪽 사이드바의 보안 메뉴에서 글로벌 보안 섹션을 여십시오.
  2. 인증 섹션에서 LTPA 옵션을 선택하십시오.
  3. 웹 및 SIP 보안을 펼치고 싱글 사인온을 클릭하십시오.
  4. 도메인 이름을 입력하십시오. 이는 참여하는 서버를 포함하는 도메인이며, 모든 서버가 동일한 도메인에 있어야 합니다. (예를 들어, 네 개의 서버(system1.sample.domain, system2.sample.domain, system3.sample.domain 및 system4.sample.domain)에 대한 도메인 이름은 sample.domain입니다.)
  5. "SSL 필요"를 선택을 취소합니다. (HTTP 프로토콜을 사용할 때는 선택을 취소함)
  6. 확인을 클릭한 후 저장을 클릭하십시오.


출처 ; http://publib.boulder.ibm.com/infocenter/clmhelp/v3r0m1/topic/com.ibm.jazz.install.doc/topics/t_ports_change.html

WAS의 기본 포트번호 변경 (옵션)
애플리케이션의 공용 URI를 설정한 후에는 공용 URI를 변경할 수 없습니다. URL 안정성을 유지보수하는 동안에도 포트 번호를 변경해야 하는 경우 적절한 새 위치로 이전 포트 번호를 사용하여 요청 경로를 지정하도록 리버스 프록시 사용을 고려하십시오. 즉, 설치 마법사를 실행하여 서버를 구성하기 전에 이 지시사항을 실행해야 합니다.


  1. 애플리케이션 서버를 시작하십시오.
  2. 애플리케이션 서버 관리자로 Integrated Solutions Console에 로그인하십시오.
  3. 서버 > 서버 유형 > WebSphere Application Servers > server_name > 포트를 클릭하십시오.
  4. 비보안 HTTP 연결에 사용할 새 포트 번호로 WC_defaulthost 값을 수정하십시오. 애플리케이션 서버에서 사용할 다른 포트 번호와 이 값이 동일하지 않은지 확인하십시오.
  5. 보안 HTTPS 연결에 사용할 새 포트 번호로 WC_defaulthost_secure 값을 수정하십시오. 애플리케이션 서버에서 사용할 다른 포트 번호와 이 값이 동일하지 않은지 확인하십시오.
  6. 적용을 클릭한 후 마스터 구성에 직접 저장을 클릭하십시오.
  7. 애플리케이션 서버를 중지한 후 다시 시작하십시오.

CLM 설치 - AIX에 커맨드로 설치하기


1. FTP로 CLM 웹 설치 및 로컬 repo 이미지를 AIX로 업로드

2. CLM 웹 설치 이미지 및 로컬 repo 압축풀기

  • mkdir install
  • cd install
  • jar -xvf  RTC-Web-Installer-AIX-3.0.1.1.zip
  • cd <ExtractedDir>/im
  • mkdir repo
  • cd repo
  • jar -xvf JTS-CCM-QM-RM-repo-3.0.1.1.zip

3. <ExtractedDir>/im/aix.motif.ppc로 이동


두 개의 샘플 응답 파일(silent-install-server.xml 및 silent-install-server2.xml)은 Jazz™ Team Server 및 Jazz 기반 애플리케이션 설치용입니다.

4(옵션1). silent-install-server.xml 응답 파일을 이용한 설치


silent-install-server.xml 응답 파일은 압축하여 파일 시스템의 다른 곳 또는 동일한 운영 체제 및 아키텍처의 다른 시스템에 재배치할 수 있는 Rational 솔루션의 설치를 생성합니다.
    
   4.1 /tmp/silent-install/JazzTeamServer 디렉토리에 서버 설치하는 명령  :
         ./userinstc -acceptLicense -dataLocation /tmp/silent-install/data -silent -showVerboseProgress -nosplash -input silent-install-server.xml


설치 예정인 Repository를 ../repo에 압축을 풀어놨죠. (jar -xvf JTS-CCM-QM-RM-repo-3.0.1.1.zip)
        <server>

                <!--
                TODO: Download and unzip the IM repositories for the server and
                trial activation keys from the "All Downloads" section of the
                product release page on jazz.net.  Verify that the repository
                locations shown below point to the unzipped IM repositories.
                -->
                <repository location='../repo' temporary='true' />

        </server>

설치 예정인 애플리케이션을 제거하려면, 다음 행을 검색하고 쉼표로 구분된 목록에서 해당 애플리케이션을 제거하십시오.
        <!--
        TODO: Add/remove feature identifiers from the 'features' attribute
        below to control which features will be installed.
            jazz - Installs the Jazz Team Server
            rtc - Installs the Change and Configuration Management app
            rdm - Installs the Requirements Management app
            rqm - Installs the Quality Management app
            com.ibm.team.install.jfs.offering.feature.id.tomcat - Installs the Tomcat application server
        -->
        <offering
            features='jazz,rtc,rdm,rqm,com.ibm.team.install.jfs.offering.feature.id.tomcat'
            id='com.ibm.team.install.calm'
        />
   4.2 (옵션)  /tmp/silent-install 디렉토리에서 ZIP를 생성하는 명령  :
        cd JazzTeamServer 
jar -cvf ../JazzTeamServer.zip *


4(옵션2). silent-install-server2.xml 응답 파일을 이용한 설치


silent-install-server2.xml 응답 파일은 플랫폼용 기본 Installation Manager 설치 위치를 사용하여 Jazz Team Server를 설치합니다.
    4.1 관리자로 공유 영역에 설치하는 명령 :
         ./installc -acceptLicense -showVerboseProgress -input silent-install-server2.xml --launcher.ini silent-install.ini
    4.2 사용자 특정 위치로 설치하는 명령 :
         ./userinstc -acceptLicense -showVerboseProgress -input silent-install-server2.xml --launcher.ini user-silent-install.ini

SCM - 캐시 서버를 사용해야 하는 경우

원문 : http://jazz.net/blog/index.php/2010/10/04/does-rational-team-concert-support-multisite/

RTC는 WAN-friendliness를 태생부터 고려해서, Eclipse file copy area가 제공하는 local disk cache의 장점을 십분 활용하고, 변경분만을 넣고 뺌으로써 최적화합니다.  초기 loading시에는 streaming과 multi-threading을 통해 서버와의 "통신량"를 줄여줍니다.

RTC에 내장된 "메트로놈" (참고 : The Jazz metronome tool keeps us honest) 을 통해 "WAN" 성능을 측정해 볼 수 있으며, 경험상 200ms 이하 latency 인 경우에는 WAN에서 충분히 사용가능하며 600ms이상인 경우, 파일 동작이 매우 느려집니다.

200ms 이하로 줄일 수 없는 경우라면, 웹 아키텍처에서 제공하는 proxy caching을 활용해 볼 수 있다. IBM / Apache Http / Squid 등 표준 웹 캐싱 테크놀로지(참고 : “Using content caching proxies for Jazz Source Control”) 를 사용할 수 있습니다. SCM 데이터를 가까운 곳에 캐싱함으로써, RTC 클라이언트로 부터의 접근시간을 크게 단축시킬 수 있습니다.

실제로 RTC 개발팀에서는 두개의 caching proxy를 구축했습니다. proxy를 구축하기 전 대부분의 네트워크 용량을 RTC build farm에서 잡아 먹었습니다. 즉 매 빌드시 대략 600MB 데이터를 가져왔고, 하루에 대략 174회의 빌드를 수행했습니다. proxy 구축 후 트래픽의 95%가 감소되었습니다. 그리고, 빌드시 fetch time도 20분에서 4분으로 줄었습니다.

Linux 파일 핸들 갯수 설정 (ulimit)

System-wide file descriptors

file-max :

file-max denotes the maximum number of file handles that the Linux kernel will allocate.

When you get a lot of error messages about "running out of file handles" , increasing this limit will help.

[root@unixfoo root]# cat /proc/sys/fs/file-max
8192
[root@unixfoo root]# echo 943718 > /proc/sys/fs/file-max
[root@unixfoo root]# cat /proc/sys/fs/file-max
943718
[root@unixfoo root]#


To make the change permanent, add the entries to /etc/sysctl.conf.

[root@unixfoo root]# cat /etc/sysctl.conf
fs.file-max = 943718
[root@unixfoo root]# sysctl -p


file-nr :

The three values in /proc/sys/fs/file-nr 
  • the number of allocated file handles, 
  • the number of allocated but unused file handles, 
  • and the maximum number of file handles. 
You can monitor this to keep a check on the file handles.

Per-process file descriptor limits
  • check the limit
[root@unixfoo root]# ulimit -n
  • become root, increase the limit
[root@unixfoo root]# ulimit -n 16384

SCM - 캐시 서버 구축 (Squid in Linux)


Linux

설치
  1. 설치해야 할 패키지:
    1. openssl : yum -y install openssl (or sudo apt-get install openssl  TIP: gksudo gnome-terminal)
    2. openssl-dev  (or libssl-dev)
    3. gcc, g++
    4. make
    5. perl
    6. vim (다른 편집기도 사용 가능)
  2. squid 3.0(http://www.squid-cache.org/Versions/v3/3.0/squid-3.0.STABLE25.tar.gz) 압축 풀기
    wget http://www.squid-cache.org/Versions/v3/3.0/squid-3.0.STABLE25.tar.gz
    (or wget http://www.squid-cache.org/Versions/v3/3.1/squid-3.1.12.tar.gz )
    tar zxvf squid-3.0.STABLE25.tar.gz
  3. cd squid-3.0.STABLE25
    (참고 : http://wiki.squid-cache.org/SquidFaq/CompilingSquid )
  4. 컴파일/링크변수 설정
    -참조 : http://gcc.gnu.org/onlinedocs/gcc/i386-and-x86_002d64-Options.html
    -참조 : http://en.gentoo-wiki.com/wiki/Safe_Cflags/Intel
              gcc -c -Q -march=native --help=target (GCC 4.2 and above support -march=native)
    -참조 : http://en.gentoo-wiki.com/wiki/Safe_Cflags/AMD

    • 64비트 OS : export CFLAGS="-O2 -pipe -m64 -march=core2 -fomit-frame-pointer -s"
      32비트 OS : export CFLAGS="-O2 -pipe -m32 -fomit-frame-pointer -s"
    • 64비트 OS : export CXXFLAGS="-O2 -pipe -m64 -march=core2 -fomit-frame-pointer -s"
      32비트 OS : export CXXFLAGS="-O2 -pipe -m32 -fomit-frame-pointer -s"
    • 64비트 OS : export LDFLAGS="-m64 -s -Wl,-O1"
      32비트 OS : export LDFLAGS="-m32 -s -Wl,-O1"
  5. ./configure -prefix=/usr/local/squid --with-pthreads --enable-storeio=ufs,aufs --enable-removal-policies=lru,heap --enable-ssl --with-large-files

    @Ubuntu
    sudo ./configure --prefix=/usr --localstatedir=/var --libexecdir=${prefix}/lib/squid --srcdir=. --datadir=${prefix}/share/squid --sysconfdir=/etc/squid --with-default-user=proxy --with-logdir=/var/log --with-pidfile=/var/run/squid.pid --with-pthreads --enable-storeio=ufs,aufs --enable-removal-policies=lru,heap --enable-ssl --with-large-files --with-filedescriptors=65535 
    -> 참조 : https://help.ubuntu.com/community/Squid : /usr/sbin/squid, /etc/squid/squid.conf
    @Ubuntu
  6. sudo make
  7. sudo make install
  8. /usr/local/squid 쓰기 가능한지 체크 

구성

  1. /usr/local/squid/etc/squid.conf 아래와 같이 대체
    (참조 : http://www.squid-cache.org/Versions/v3/3.0/cfgman/ )

    cache_store_log
     none 
    cache_peer
      parent 0 no-query originserver name=httpsAccel ssl
    (앞줄 계속) login=PROXYPASS sslflags=DONT_VERIFY_PEER 
    cache_peer_access
     httpsAccel allow all
    coredump_dir /usr/local/squid/var/cache 
    http_access
     allow all 
    https_port
      cert=/usr/local/squid/etc/server.pem accel key=/usr/local/squid/etc/privkey.pem vhost 
    refresh_pattern
     . 0 20% 4320 
    cache_replacement_policy
     heap GDSF 
    memory_replacement_policy
     heap GDSF 
    cache_dir
     aufs /usr/local/squid/var/cache 256 256 
    cache_mem
      MB 
    cachemgr_passwd
     disable all 
    maximum_object_size
     1048576 KB 
    maximum_object_size_in_memory
     16384 KB 
    buffered_logs
     on 
    visible_hostname
     
    1. Replace all references of with the hostname of the server you wish to proxy.
    2. Replace all references of with the port name that your jazz server listens upon.
    3. Replace all references of with the hostname of your proxy machine.
    4. Replace all references of with the port of your proxy machine.
    5. Replace all references of with the amount of RAM that you want to allocate to squid's caching.  This must be less than the available memory on the machine. 
    6. Replace all references of  in MBytes with the amount of diskspace you want ot allocate to squid.  This must be less than the available disk space in "/usr/local/squid/var/cache".  
    Squid 설정 예
    cache_store_log none
    cache_peer x.x.x.x parent 9443 0 no-query originserver name=httpsAccel ssl login=PROXYPASS sslflags=DONT_VERIFY_PEER
    cache_peer_access httpsAccel allow all
    coredump_dir /usr/local/squid/var/cache
    http_access allow all
    https_port 9443 cert=/usr/local/squid/etc/server.pem accel key=/usr/local/squid/etc/privkey.pem vhost
    refresh_pattern . 0 20% 4320
    cache_replacement_policy heap GDSF
    memory_replacement_policy heap GDSF
    cache_dir aufs /home/SquidCache 131072 256 256
    cache_swap_low 70
    cache_swap_high 97
    cache_mem 4096 MB
    cachemgr_passwd disable all
    maximum_object_size 1048576 KB
    maximum_object_size_in_memory 16384 KB
    buffered_logs on
    visible_hostname x.x.x.x

  2. server.pem과 privkey.pem 파일을 /usr/local/squid/etc 아래로 복사
    • 인증서 만들기
      1. openssl req -new -keyform PEM -x509 -out server.pem
      2. openssl rsa -in privkey.pem -out privkey.pem.new
      3. cp privkey.pem.new privkey.pem
      4. cp server.pem /usr/local/squid/etc/
      5. cp privkey.pem /usr/local/squid/etc/
  3. cd /usr/local/squid/sbin
  4. 캐시 디렉토리(/usr/local/squid/var/cache) 구조화/초기화 실행 :

    @Ubuntu
    sudo touch /var/log/cache.log /var/log/access.log
    sudo chown proxy /var/log/cache.log /var/log/access.log

    @Ubuntu

    sudo su proxy
    ./squid -z(참조 : http://manpages.ubuntu.com/manpages/dapper/en/man8/squid.8.html )
  5. 프락시서버 데몬 실행 :
    sudo ./squid
If things are not working properly, check the var/logs/cache.log for errors
you will see TCP_HIT and TCP_MISS logging in the access.log which will indicate whether or not the cache is being hit

출처 : https://jazz.net/wiki/bin/view/Main/SCMWithCachingProxy


Squid 로그 처리

/usr/local/squid/var/logs/cache.log

You need to rotate your log files with a cron job. For example in /etc/crontab:
# .---------------- minute (0 - 59)
# |  .------------- hour (0 - 23)
# |  |  .---------- day of month (1 - 31)
# |  |  |  .------- month (1 - 12) OR jan,feb,mar,apr ...
# |  |  |  |  .---- day of week (0 - 6) (Sunday=0 or 7)  OR
#sun,mon,tue,wed,thu,fri,sat
# |  |  |  |  |
# *  *  *  *  *  command to be executed
    0  0   *   *  * /usr/local/squid/sbin/squid -k rotate


프락시 캐시 서버 16GB/8GB인 경우 Squid 설정값 예 

cache_replacement_policy heap GDSF
memory_replacement_policy heap GDSF
cache_dir aufs /usr/local/squid/var/cache 102400 256 256
cache_mem 12288 MB (8GB인 경우 6144 MB)
cache_store_log none
cache_peer xxx.xxx.xxx.xxx parent 9443 0 no-query originserver name=httpsAccel ssl login=PROXYPASS sslflags=DONT_VERIFY_PEER
cache_peer_access httpsAccel allow all
coredump_dir /usr/local/squid/var/cache
http_access allow all
https_port 9443 cert=/usr/local/squid/etc/server.pem accel key=/usr/local/squid/etc/privkey.pem vhost
refresh_pattern . 0 20% 4320
cachemgr_passwd disable all
maximum_object_size 1024 MB
maximum_object_size_in_memory 16 MB
buffered_logs on
visible_hostname xxx.xxx.xxx.xxx
cache_swap_low 90
cache_swap_high 95

오타와 Lab의 Squid 설정값
  • used 256 Level1 dirs
  • aufs storage (coss would be even better but is not recommended for production in 3.0 yet).
  • Disable the cache_store_log.
  • 4GB of memory cache
  • max object size in memory: 16MB
  • 16GB of disk cache
  • max cached object size: 1GB
  • GDSF as memory and disk cache replacement policy
  • turned on buffered logs
  • set up cron to rotate the logs every day.

캐시서버로 권고하는 RAID 구성RAID 0 
- 이유는 속도가 가장 빠르고,  캐시인 까닭에 미러링을 덜 고려할 수 있습니다.

캐시서버 스펙 예
  • OS : RedHat Enterprise Server 
  • 캐시 서버 S/W : Squid (오픈소스) 
  • CPU : Intel Xeon 3.16 Ghz * 2 
  • RAM : 8GB RAM 
  • HDD : SCSI HDD 6 * 146 GB with RAID 0 
HDD는 일반 PC급 DISK가 아닌 서버급 HDD를 권장하며, Squid를 사용하기 위해서 Linux 서버급 운영체제를 권장합니다.


RTC 2.0.0.1 캐싱 자료 - http://jazz.net/library/article/325
RTC 1.0.1 캐싱 자료 - http://jazz.net/library/techtip/94

SCM - 급한 코딩 먼저 (suspend and resume)

한참 코딩 작업 중인데, 급한 코딩 작업을 해야 합니다.

1. 이때 현재 작업을 저장해 놓기 위해서 나의 저장소 작업공간에 체크인 한후에 해당 변경세트를 일시 중단합니다.
 

2. 일시 중단이 완료되면 작업 중인 파일 내용은 작업하기 이전 상태로 내용이 원복됩니다.
 

3. 이제 급한 일을 처리하기 위해 코드를 수정하고 변경세트로 체크인한 후 스트림으로 전달합니다.
 

4. 급한일을 마무리한 후, 일시 중단한 작업을 재개합니다. (같은 파일을 수정한 경우에는 병합을 해야 하겠죠.)
 

5. (같은 파일을 수정한 경우라면) 병합 작업을 합니다.
 

6. 병합 작업과 더불어 이전에 하던 코딩 작업을 계속 수행합니다. 계속!!!


2011년 11월 24일 목요일

RTC 버전3 서버 튜닝

출처 : https://jazz.net/library/article/557


Introduction

This article serves as a source for optimization settings and troubleshooting strategies in order to ensure that you get the best performance out of your Rational Team Concert (RTC) deployment. 

This guide does not replace the RTC installation instructions.  To understand this document, users should have already had some experience getting the Jazz Team RTC Server installed and working with the appropriate web container and database.  This guide also complements the RTC server sizing guide as a source for deployment recommendations. 

The Jazz Team RTC Server consists of two distinct logical parts, each of which can be tuned separately, but also may require tuning relative to each other, depending upon the conditions of the deployment.  As illustrated in figure 1, the Jazz Team RTC Server consists of two logical tiers which can be deployed either on a single piece of hardware, or spread across two separate server machines.  

RTC Jazz Team Server
Figure 1 : Jazz Team RTC Server logical structure

2011년 11월 20일 일요일

SCM - 플로우 다이어그램


플로우 다이어그램을 하나 만듭니다.


플로우 대상을 "BRANCH 스트림"에서 "MAIN 스트림"으로 바꿔보도록 하죠..

(1) 플로우 대상 바꾸기 전


(2) 플로우 대상 바꾸기
화살표를 선택하고 나서, 화살표 머리를 Branch 스트림에서 Main 스트림으로 마우스로 끌고 갑니다.


(3) 플로우 대상 변경 후의 모습

SCM - RTC Shed 개발 작업 백업

RTC 백업 Shed 또한 소스제어시(Load, Accept, Suspend, Resume, Discard, Undo) 백업을 저장합니다.
이클립스 로컬 히스토리가 사용할 수 없는 경우에 유용합니다.

- 이클립스 작업공간 외부로 파일을 로드해야 하는 경우
- 로드 또는 허용 전에 로컬 수정을 하고 프로젝트를 닫는 경우

(1) RTC 백업 Shed 활성화


(2) 백업 저장 위치 : Sandbox 위치 아래 .jazzShed 폴더


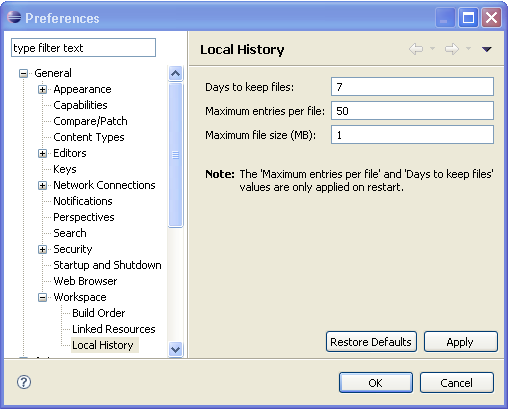
SCM - 이클립스 로컬 히스토리 개발작업 백업

이클립스에는 파일/폴더를 저장, 삭제할 때, 이전 버전 정보를 이클립스 로컬 히스토리에 저장합니다.
-- RTC 소스제어시에도 해당됨(ex, Load, Accept, Suspend, Resume, Discard, Undo)

즉 RTC를 이용한 버전 이력과 별도로 이클립스 자체적으로 히스토리를 관리하고 있어서,
그날 중간 중간 바꾼 내용을 되살리거나 다시 보고자 할때 편리하게 사용할 수 있습니다.

(1) 이클립스 로컬 히스토리 환경 설정


(2) 이클립스 로컬 히스토리의 이전 버전과 비교


(3) 이클립스 로컬 히스토리 버전으로 복원


SCM - 이클립스 상의 파일 UTF-8 인코딩 설정

In the eclipse IDE the default encoding can (and must) be set to UTF-8. This can be done under Window | Preferences | General | Workspace | Text file encoding


Additionally, there are file-type specific settings under Window | Preferences | General | Content Types


The encoding of a newly created file, of course, may be defined here: Window | Preferences | Web and XML | ... files
where you have to set the file encoding for each kind of file separately.


In addition, eclipse should be started given UTF-8 as default encoding. This can be done with an additional startup property in the eclipse.ini file:

add -Dfile.encoding=UTF-8 at the end of eclipse.ini.


참고: 커맨드(iconv)를 이용한 파일 인코딩 변환방법 (Linux/Unix)

사용방법
$ iconv [옵션] [원본파일]
옵션:
-f 원본파일의 인코딩 방식
-t 콘솔출력의 인코딩 방식

변환 예 EUC-KR 인코딩 파일을 UTF8로 변환하기
$ iconv -f EUC-KR -t UTF8 test_euc_kr.txt > test_utf.txt


This is also useful when launching applications from eclipse. Add the above parameter to the arguments: Run| Run Configurations| Arguments | VM Arguments

SCM - 예전 작업 취소하기


특정 버전에서 했던 코딩 작업을 취소해야 할 때가 있습니다.


파일을 선택하고 팀->주석 달기를 합니다

파일의 특정라인에서 해당 변경세트를 찾습니다.


파일의 팀->히스토리 표시를 통해 해당 변경세트를 찾고 되돌리기를 하여 되돌리기 패치를 만듭니다

패치에서 되돌리기할 파일만 남기고 나머지 파일은 보기에서 제거를 합니다.


이제 패치를 작업공간으로 병합합니다.

병합 작업이 끝나면 패치를 보기에서 제거하고 변경 사항을 체크인합니다.

SCM - 특정 버전으로 되돌리기

작업을 하다보면 잘못 올리는 경우가 있는 데, 특정 버전으로 되돌려야 하는 경우가 많습니다.

  1. 먼저 특정 파일의 히스토리를 봅니다. 방법은 팀->히스토리 표시.
  2. 해당 버전을 선택하고 로드를 합니다.
  3. 이제 체크인을 하고 전달 합니다.

SCM - 파일 버전 히스토리

"파일->팀->히스토리 보기"를 할 때
1. 저장소 작업공간,
2. 대상 스트림,
3. 전체 저장소 등

컨텍스트 별로 범위를 달리해서 히스토리를 볼 수 있습니다.

  • 아래는 "전체 저장소" 컨텍스트에 해당하는 예입니다.


  • 아래는 "스트림" 컨텍스트에 해당하는 예입니다.


  • 아래는 보통 보게 되는 "저장소 작업공간" 컨텍스트에서의 히스토리 보기 예입니다. 

SCM - 파일 아이콘 설명

  • Shared files (yellow cylinder)
  • Uncommitted shared files (yellow background)
  • Outgoing changes (black right-facing arrow)
  • Incoming changes (blue left-facting arrow)
  • Collisions (orange arrows)
  • Ignored items from the repository (gray cylinder)
  • Ignored items not in the repository (nothing)
  • Locks owned by you (blue) others (red)

RTC 2.x 설치 및 셋업관련 Tomcat/DB2 도해

1. DB2를 설치합니다.
: TCP/IP 포트는 디폴트 50000오로 DB2 인스턴스가 만들어 집니다.
: db2admin 어드민 계정이 또한 만들어 집니다.

2. DB2 인스턴스를 디폴트로 실행됩니다.
: 윈도두서비스로 등록되어 있고, 커맨드로 시작/중지 가능합니다.
: db2start/db2stop


3. DBA가 JAZZ용 데이터베이스를 만듭니다.
: db2 create db JAZZ pagesize 8192


4. RTC 서버를 설치합니다. 그리고 JAZZ 데이터베이스에 테이블을 만듭니다.
: teamserver.properties 파일을 수정하고 repotools -createTables를 수행합니다.


5. JAZZ 서버를 띄웁니다.
: server.startup을 실행합니다.


6. JAZZ 서버를 셋업합니다.
: https://localhost:9443/jazz/setup을 통해 설정합니다.


SCM - 연결 제한시간 조정

Jazz 저장소 연결 속성 변경을 통해 연결 제한시간을 조정합니다.

보통 대용량 파일을 전송할 때 필요합니다.
최대 9999 (초)로 대용량 업로드시 바꿔볼 수 있습니다.

timeout설정1.png  


SocketTimeoutException 방지를 할 수 있습니다.

SCM - 이클립스 힙크기 조정

eclipse.ini 파일을 수정한 뒤에 RTC Eclipse Client를 실행합니다.

c:\JazzSCM\client\eclipse> type eclipse.ini
...
-vmargs
-Xmx1024m

OutOfMemoryError 방지를 할 수 있습니다.
이클립스 힙 모니터링 방법은 아래와 같습니다.
힙 크기 표시.png 


빌드엔진도 마찬가지 방법으로 힙크기를 조정할 수 있습니다.

c:\JazzBuild\buildsystem\buildengine\eclipse> type jbe.ini
...
-vmargs
-Xmx=500M


-Xmx=500M으로 바꿀 경우는 jbe 실행시 -vm을 바꿔줘야 합니다.

c:\JazzBuild\buildsystem\buildengine\eclipse> jbe -vm c:\JazzSCM\client\eclipse\jdk\bin
-repository https://my.jazz.server:9443/ccm -userId build -pass build
-engineId my.build.engine -sleepTime 5

SCM - 전송 쓰레드 수 조정

창(W)->환경 설정(P) 메뉴로 환경 설정 대화 상자를 띄우고, 스레드 최대의 수를 조정합니다.

컨텐츠 전송 : 스레드 최대의 수 : 10(디폴트 값)

컨텐츠 전송 스레드 최대수.png

Client API - 특정 상태를 이용한 쿼리


repo.login(monitor);

IProcessClientService processClient = (IProcessClientService)repo.getClientLibrary(IProcessClientService.class);
URI uri = URI.create(prjAreaName.replaceAll(" ", "%20"));
IProjectArea prjArea = (IProjectArea)processClient.findProcessArea(uri, null, null);
IProjectAreaHandle prjAreaHandle = (IProjectAreaHandle)prjArea.getItemHandle();

IContributorManager contributorManager = repo.contributorManager();
IContributor kdyoung = contributorManager.fetchContributorByUserId(userId, null);
System.out.println(kdyoung.getEmailAddress());

IQueryClient queryClient = (IQueryClient) repo.getClientLibrary(IQueryClient.class);
IAuditableClient auditableClient = (IAuditableClient) repo.getClientLibrary(IAuditableClient.class);
IQueryableAttributeFactory attFactory = QueryableAttributes.getFactory(IWorkItem.ITEM_TYPE);

Client API - 상태그룹 쿼리


repo.login(monitor);

IProcessClientService processClient = (IProcessClientService)repo.getClientLibrary(IProcessClientService.class);
URI uri = URI.create(prjAreaName.replaceAll(" ", "%20"));
IProjectArea prjArea = (IProjectArea)processClient.findProcessArea(uri, null, null);
IProjectAreaHandle prjAreaHandle = (IProjectAreaHandle)prjArea.getItemHandle();

IContributorManager contributorManager = repo.contributorManager();
IContributor kdyoung = contributorManager.fetchContributorByUserId(userId, null);
System.out.println(kdyoung.getEmailAddress());

IQueryClient queryClient = (IQueryClient) repo.getClientLibrary(IQueryClient.class);
IAuditableClient auditableClient = (IAuditableClient) repo.getClientLibrary(IAuditableClient.class);
IQueryableAttributeFactory attFactory = QueryableAttributes.getFactory(IWorkItem.ITEM_TYPE);

Client API - 특정 프로젝트 영역에 멤버와 역할을 추가


repo.login(monitor);

IProcessClientService processClient = (IProcessClientService)repo.getClientLibrary(IProcessClientService.class);
URI uri = URI.create(prjAreaName.replaceAll(" ", "%20"));
IProjectArea prjArea = (IProjectArea)processClient.findProcessArea(uri, null, null);

IProcessItemService processService = (IProcessItemService)repo.getClientLibrary(IProcessItemService.class);
IClientProcess process = processService.getClientProcess(prjArea, monitor);
IRole[] availableRoles = process.getRoles(prjArea, monitor);

Client API - 작업항목 ID 검색 및 열거형 값 수정


repo.login(monitor);

//static String prjAreaName = "My Project1";
IProcessClientService processClient = (IProcessClientService)repo.getClientLibrary(IProcessClientService.class);
URI uri = URI.create(prjAreaName.replaceAll(" ", "%20"));
IProjectArea prjArea = (IProjectArea)processClient.findProcessArea(uri, null, null);
IProjectAreaHandle prjAreaHandle = (IProjectAreaHandle)prjArea.getItemHandle();

//static int workItemNumber = 15;
IWorkItemClient workItemClient = (IWorkItemClient) repo.getClientLibrary(IWorkItemClient.class);
IWorkItemWorkingCopyManager copyManager = workItemClient.getWorkItemWorkingCopyManager();
IWorkItemHandle workItemHandle = workItemClient.findWorkItemById(workItemNumber, IWorkItem.FULL_PROFILE, monitor);
copyManager.connect(workItemHandle, IWorkItem.FULL_PROFILE, monitor);
WorkItemWorkingCopy workItemCopy = copyManager.getWorkingCopy(workItemHandle);
IWorkItem workItem = workItemCopy.getWorkItem();

Client API - 작업항목 ID 검색 및 열거형 값 출력


repo.login(monitor);

//static String prjAreaName = "My Project1";
IProcessClientService processClient = (IProcessClientService)repo.getClientLibrary(IProcessClientService.class);
URI uri = URI.create(prjAreaName.replaceAll(" ", "%20"));
IProjectArea prjArea = (IProjectArea)processClient.findProcessArea(uri, null, null);
IProjectAreaHandle prjAreaHandle = (IProjectAreaHandle)prjArea.getItemHandle();

//static int workItemNumber = 15;
IWorkItemClient workItemClient = (IWorkItemClient) repo.getClientLibrary(IWorkItemClient.class);
IWorkItemWorkingCopyManager copyManager = workItemClient.getWorkItemWorkingCopyManager();
IWorkItemHandle workItemHandle = workItemClient.findWorkItemById(workItemNumber, IWorkItem.FULL_PROFILE, monitor);
copyManager.connect(workItemHandle, IWorkItem.FULL_PROFILE, monitor);
WorkItemWorkingCopy workItemCopy = copyManager.getWorkingCopy(workItemHandle);
IWorkItem workItem = workItemCopy.getWorkItem();

Client API - 특정 프로젝트 영역의 속성 목록 및 특정 열거형 리터럴 목록 출력


repo.login(monitor);

//static String prjAreaName = "My Project1";
IProcessClientService processClient = (IProcessClientService)repo.getClientLibrary(IProcessClientService.class);
URI uri = URI.create(prjAreaName.replaceAll(" ", "%20"));
IProjectArea prjArea = (IProjectArea)processClient.findProcessArea(uri, null, null);
IProjectAreaHandle prjAreaHandle = (IProjectAreaHandle)prjArea.getItemHandle();

IWorkItemClient workItemClient = (IWorkItemClient) repo.getClientLibrary(IWorkItemClient.class);
List<IAttribute> listAttributes = workItemClient.findAttributes(prjAreaHandle, monitor);
System.out.println("--------");
System.out.println("속성 목록");
System.out.println("--------");
for (IAttribute attribute : listAttributes) {
   System.out.println("속성 Name: " + attribute.getDisplayName());
   System.out.println("속성 ID: " + attribute.getIdentifier());
}

Client API - 작업항목 첨부문서를 디스크에 저장


repo.login(monitor);

IWorkItemClient workItemClient = (IWorkItemClient) repo.getClientLibrary(IWorkItemClient.class);
IWorkItemWorkingCopyManager copyManager = workItemClient.getWorkItemWorkingCopyManager();
IWorkItemHandle workItemHandle = workItemClient.findWorkItemById(
workItemNumber, IWorkItem.FULL_PROFILE, monitor);
copyManager.connect(workItemHandle, IWorkItem.FULL_PROFILE, monitor);
WorkItemWorkingCopy workItemCopy = copyManager.getWorkingCopy(workItemHandle);
// IWorkItem workItem = workItemCopy.getWorkItem();
IWorkItemReferences references = workItemCopy.getReferences();

Client API - 작업항목에 문서첨부


repo.login(monitor);

IWorkItemClient workItemClient = (IWorkItemClient) repo.getClientLibrary(IWorkItemClient.class);
IWorkItemWorkingCopyManager copyManager = workItemClient.getWorkItemWorkingCopyManager();
IWorkItemHandle workItemHandle = workItemClient.findWorkItemById(workItemNumber, IWorkItem.FULL_PROFILE, monitor);
copyManager.connect(workItemHandle, IWorkItem.FULL_PROFILE, monitor);
WorkItemWorkingCopy workItemCopy = copyManager.getWorkingCopy(workItemHandle);
//IWorkItem workItem = workItemCopy.getWorkItem();

File file = new File("C:/FileToAttache.txt");
IReference fileRef = IReferenceFactory.INSTANCE.createReferenceFromURI(file.toURI(), file.getName());
IWorkItemReferences references = workItemCopy.getReferences();
references.add(WorkItemEndPoints.ATTACHMENT, fileRef);
IDetailedStatus saveStatus = workItemCopy.save(monitor);
System.out.println("Save Status : " + (saveStatus.isOK() ? "Success" : "Fail"));

TeamPlatform.shutdown();

Client API - 작업항목 ID 검색 및 삭제


repo.login(monitor);

IWorkItemClient workItemClient = (IWorkItemClient) repo.getClientLibrary(IWorkItemClient.class);
IWorkItemWorkingCopyManager copyManager = workItemClient.getWorkItemWorkingCopyManager();
IWorkItemHandle workItemHandle = workItemClient.findWorkItemById(workItemNumber, IWorkItem.FULL_PROFILE, monitor);
copyManager.connect(workItemHandle, IWorkItem.FULL_PROFILE, monitor);
WorkItemWorkingCopy workItemCopy = copyManager.getWorkingCopy(workItemHandle);
IStatus deleteStatus = workItemCopy.delete(monitor);
System.out.println("Delete Status : " + (deleteStatus.isOK() ? "Success" : "Fail"));

TeamPlatform.shutdown();

Client API - 특정 유형의 작업항목 생성


repo.login(monitor);

IProcessClientService processClient = (IProcessClientService)repo.getClientLibrary(IProcessClientService.class);
URI uri = URI.create(prjAreaName.replaceAll(" ", "%20"));
IProjectArea prjArea = (IProjectArea)processClient.findProcessArea(uri, null, null);
IProjectAreaHandle prjAreaHandle = (IProjectAreaHandle)prjArea.getItemHandle();

IWorkItemClient workItemClient = (IWorkItemClient) repo.getClientLibrary(IWorkItemClient.class);
IWorkItemWorkingCopyManager copyManager = workItemClient.getWorkItemWorkingCopyManager();
IWorkItemType workItemType = workItemClient.findWorkItemType(prjAreaHandle, "Issue", null);
IWorkItemHandle workItemHandle = copyManager.connectNew(workItemType, monitor);
WorkItemWorkingCopy workItemCopy = copyManager.getWorkingCopy(workItemHandle);
IWorkItem workItem = workItemCopy.getWorkItem();
workItem.setHTMLSummary(XMLString.createFromPlainText("Test - Adding work item"));
IDetailedStatus saveStatus = workItemCopy.save(monitor);
System.out.println("Save Status : " + (saveStatus.isOK() ? "Success" : "Fail"));

TeamPlatform.shutdown();

Client API - 작업항목 ID 검색 및 수정


repo.login(monitor);

IWorkItemClient workItemClient = (IWorkItemClient) repo.getClientLibrary(IWorkItemClient.class);
IWorkItemWorkingCopyManager copyManager = workItemClient.getWorkItemWorkingCopyManager();
IWorkItemHandle workItemHandle = workItemClient.findWorkItemById(workItemNumber, IWorkItem.FULL_PROFILE, monitor);
copyManager.connect(workItemHandle, IWorkItem.FULL_PROFILE, monitor);
WorkItemWorkingCopy workItemCopy = copyManager.getWorkingCopy(workItemHandle);
IWorkItem workItem = workItemCopy.getWorkItem();
workItem.setHTMLSummary(XMLString.createFromPlainText("Test - Editing work item"));
IDetailedStatus saveStatus = workItemCopy.save(monitor);
System.out.println("Save Status : " + (saveStatus.isOK() ? "Success" : "Fail"));

TeamPlatform.shutdown();

Client API - 쿼리 결과를 리스트로 만들기


IQueryResult<IResolvedResult<IWorkItem>> queryResult = queryClient.getResolvedExpressionResults(prjAreaHandle, term, IWorkItem.FULL_PROFILE);

List<IWorkItem> matchingWorkItems = new ArrayList<IWorkItem>(queryResult.getResultSize(monitor).getTotalAvailable());
while (queryResult.hasNext(monitor)) {
matchingWorkItems.add(queryResult.next(monitor).getItem());
}

for (IWorkItem workItem : matchingWorkItems) {
System.out.println(workItem.getId() + " - " + workItem.getHTMLSummary().getPlainText());
}

TeamPlatform.shutdown();

쿼리에 관련된 보다 자세한 정보는 https://jazz.net/wiki/bin/view/Main/QueryDevGuide

Client API - 특정 프로젝트 영역내 특정 작업항목 유형 쿼리


IProjectAreaHandle prjAreaHandle = (IProjectAreaHandle)prjArea.getItemHandle(); 

IQueryClient queryClient = (IQueryClient) repo.getClientLibrary(IQueryClient.class);
IAuditableClient auditableClient = (IAuditableClient) repo.getClientLibrary(IAuditableClient.class);
IQueryableAttributeFactory attFactory = QueryableAttributes.getFactory(IWorkItem.ITEM_TYPE);

IQueryableAttribute typeAttribute = attFactory.findAttribute(prjAreaHandle, IWorkItem.TYPE_PROPERTY, auditableClient, null);
Expression expression = new AttributeExpression(typeAttribute, AttributeOperation.EQUALS, workItemTypeName);

IQueryableAttribute projectAreaAttribute = attFactory.findAttribute(prjAreaHandle, IWorkItem.PROJECT_AREA_PROPERTY, auditableClient, null);
AttributeExpression projectAreaExpression = new AttributeExpression(projectAreaAttribute, AttributeOperation.EQUALS, prjAreaHandle);

Term term = new Term(Operator.AND);
term.add(projectAreaExpression);
term.add(expression);

IQueryResult<IResolvedResult<IWorkItem>> queryResult = queryClient.getResolvedExpressionResults(prjAreaHandle, term, IWorkItem.FULL_PROFILE);

System.out.println("# of Query Results: " + queryResult.getResultSize(monitor).getTotal());

TeamPlatform.shutdown();


쿼리에 관련된 보다 자세한 정보는 https://jazz.net/wiki/bin/view/Main/QueryDevGuide

Client API - 특정 작업항목 유형 쿼리

IProjectAreaHandle prjAreaHandle = (IProjectAreaHandle)prjArea.getItemHandle();

IQueryClient queryClient = (IQueryClient) repo.getClientLibrary(IQueryClient.class); IAuditableClient auditableClient = (IAuditableClient) repo.getClientLibrary(IAuditableClient.class); IQueryableAttributeFactory attFactory = QueryableAttributes.getFactory(IWorkItem.ITEM_TYPE); IQueryableAttribute typeAttribute = attFactory.findAttribute(prjAreaHandle, IWorkItem.TYPE_PROPERTY, auditableClient, null); Expression expression= new AttributeExpression(typeAttribute, AttributeOperation.EQUALS, "Issue"); IQueryResult<IResolvedResult<IWorkItem>> queryResult = queryClient.getResolvedExpressionResults(prjAreaHandle, expression, IWorkItem.FULL_PROFILE); System.out.println("# of Query Results: " + queryResult.getResultSize(null).getTotal());

TeamPlatform.shutdown();


쿼리에 관련된 보다 자세한 정보는 https://jazz.net/wiki/bin/view/Main/QueryDevGuide

Client API - 프로젝트 영역 핸들 가져오기


repo.login(monitor);

String prjAreaName = "My Project Area";
IProcessClientService processClient = (IProcessClientService)repo.getClientLibrary(IProcessClientService.class);
URI uri = URI.create(prjAreaName.replaceAll(" ", "%20"));
IProjectArea prjArea = (IProjectArea)processClient.findProcessArea(uri, null, null);
IProjectAreaHandle prjAreaHandle = (IProjectAreaHandle)prjArea.getItemHandle();

Client API - 저장소에 로그인하기

public static void main(String[] args) {
try {
IProgressMonitor monitor = new NullProgressMonitor();
TeamPlatform.startup();
//RepositoryPackage.eINSTANCE.eContents(); 
ITeamRepository repo = TeamPlatform.getTeamRepositoryService().getTeamRepository("https://clm.jkebanking.net:9443/ccm");
repo.registerLoginHandler(new ITeamRepository.ILoginHandler() {
public ILoginInfo challenge(ITeamRepository repository) {
return new ILoginInfo() {
public String getUserId() {
return "kdyoung";
}
public String getPassword() {
return "password"; 
}
};
}
});
//repo.setProxy("IP", port, null,null);
repo.login(monitor);
TeamPlatform.shutdown();
}
catch (TeamRepositoryException e) {
e.printStackTrace();
}
}