2011년 12월 9일 금요일

JAF - HelloJFS

Building HelloJFS 위키

build an application "HelloJFS" using the Jazz Application Frameworks SDK and Jazz Foundation Services.

  • displays the name of the user logging in with a greeting message.
  • designed to demonstrate some of the key capabilities of the Jazz Application Frameworks.

learn the following:
  • Consuming JFS Discovery Service
  • Delegating authentication to Jazz Team Server
  • Consuming JFS Current User Service
  • Consuming JFS Storage Service
  • Consuming JFS Query Service
  • Deploying our sample application 

튜토리얼

  1. Download and Install
  2. setup IDE for development
  3. HelloJFS Application Design
  4. Creating Plug-in Project
  5. Creating REST service and setting application configuration
  6. Making HelloJFS an OAuth Consumer and Delegating Authentication to JTS
  7. Using Current User Service
  8. Storing HelloJFS Resources
  9. Querying HelloJFS Resources
  10. Packaging and Deploying HelloJFS

2011년 12월 8일 목요일

TESTRT - Makefile수정


hello.c로 부터 hello.exe를 만들기

CC = gcc
hello.exe : hello.o
        $(CC) -o hello.exe hello.o
hello.o : hello.c
        $(CC) -c hello.c
clean :
        rm -f hello.exe hello.o

hello.c로 부터 INSTRUMENT된 hello.exe를 만들기

CC = attolcc -keep -mempro -block=logical -- gcc
hello.exe : hello.o
        $(CC) -o hello.exe hello.o
hello.o : hello.c
        $(CC) -c hello.c
clean :
        rm -f hello.exe hello.o hello_aug.c hello.i hello.c.tsf hello.c.fdc TP.o products.h

2011년 12월 7일 수요일

TESTRT - 메모리 프로파일링


low level of mempro options:
--atp_reports_fiu=0
--atp_reports_sig=0
--atp_reports_ffm_fmwl=0
--atp_reports_abwl=0
--atp_no_track_allocs_before_init
--atp_keep_content
--atp_dump_block_only_once
--linenumoptim


Memory profiling for C/C++ with IBM Rational Test RealTime

현재의 메모리 프로파일을 분석하고 나면, 에러 및 경고 관련된 정보를 제공합니다.
메모리 프로파일에서 식별하는 에러는 아래와 같습니다:
  • FFM (freeing freed memory) -- 응용이 이미 해제한 메모리를 다시 해제하려합니다. 
  • FUM (freeing unallocated memory) -- 응용이 할당받지 않은 메모리를 해제하려합니다. 
  • ABWL (array bounds write, late detect) -- 배열의 경계가 깨졌음을 탐지했습니다. 
  • FMWL (free memory write, late detect) -- 응용이 이미 해제한 메모리에 쓰기를 하려합니다. 
  • MAF (memory allocation failure)
메모리 프로파일에서 식별하는 경고는 아래와 같습니다:
  • MLK (memory leak) -- 할당받은 메모리 블록에 대한 참조를 찾을 수 없어서, 메모리 누수로 판정합니다. 
  • MPK (potential memory leak) -- 할당받은 메모리 블록에 대한 참조는 찾을 수 있지만, 참조가 블록의 맨앞부분이 아닌 중간 어딘가를 가리키고 있습니다. 
  • MIU (memory in use) -- 할당받고 해제되지 않은 모든 메모리 블럭을 나열하고 각 블록에 대한 참조를 찾을수 있습니다. 
코드삽입(instrumentation) 단계동안, 응용 소스파일은 맨 먼저 전처리(preprocess)되고 새로운 임시 소스파일을 만듭니다. 전처리된 소스파일은 이후 툴의 루틴 호출을 포함한 코드가 삽입됩니다. 만약 응용의 소스코드에 메모리 할당/해제 문장 예를 들어 malloc 또는 free  등은 래쇼날 유틸리티 _atp_malloc과 _atp_free로 대체되어 호출됩니다. 이를 통해 툴은 힙(heap)으로 부터 할당된 모든 메모리를 추적할 수 있습니다. (만약 TestRealTime 설치했다면 _atp_malloc 구현부분을 ../Test RealTime/Targets/여러분의TDP/lib/atp.c에서 확인할 수 있습니다.) 마찬가지로, 만약 C++ 응용 코드에서 new 또는 delete 문장을 사용한다면, 래쇼날 유틸리티에서 오버로딩(overload)된 new와 delete 연산자(operator)로 대체됩니다.


응용이 힙(heap)으로 부터 새로운 블록을 할당할때 마다, 툴은 해당 블록에 대한 정보를 해시 테이블(hash table)에 저장합니다. 나중에 메모리 분석시에 해시 테이블에 저장된 메모리 블럭의 주소값을 다음 영역에서 검색을 합니다:
  • 각 쓰레드(thread)나 태스크(task)의 스택(stack) 데이터 
  • 글로벌(global)과 정적(static)에서 할당한 데이터 
  • 그 밖의 힙(heap)에서 할당받은 블럭 
만약 할당받은 메모리블럭에 대한 주소를 위 영역에서 찾을 수 없으면, 해당 블럭은 "누수"로 판정합니다


응용이 성공적으로 빌드되고 나면, 타겟으로 배포를 하고, 여느때처럼 실행을 합니다. 예를 들어 타겟에 대해 일상적인 회귀 시험을 할 수 있습니다. 실행동안 캡처한 데이터는 가능한 수단을 통해 호스트로 전송합니다. 예를 들어 만약 타겟에 파일 시스템이 있고 FTP 서비스를 지원한다면, FTP를 통해 파일을 전송할 수 있습니다. 혹은 디버거를 통해 전송할 수도 있습니다. 여러가지 가능한 방법 중에서 가장 적합한 방법을 활용하여 데이터를 호스트로 전송합니다. 호스트에 데이터를 파일로 전송한 이후에는 후처리(postprocess)를 하여 상세 보고에 필요한 정보를 생산해 냅니다.

TESTRT - 덤프코드


덤프코드 삽입 위치

덤프코드 호출시 다른 쓰레드는 호출하지 않는 함수에 덤프코드를 삽입해야 합니다.
그리고 -DUMPINCOMING= is the list of function entry that start the dump by calling atl_obstool_dump에 지정된 함수는 같은 thread에서 수행되어야 합니다.

% 주의 : mutex 함수는 INSTRUMENT하면 안됩니다.


덤프코드 삽입 방법

1) TESTRT INSTRUMENTER로 하여금 덤프코드를 삽입하는 방식으로 TESTRT INSTRUMENTATION될때만 실행할 수 있는 장점을 제공합니다.
(링크시점에 INSTRUMENTER는 TP.c[pp]를 컴파일하고 TP.o를 링크합니다.)
  • #pragma attol insert printf("BEGIN -- TESTRT DUMP \n");
  • #pragma attol insert _ATCPQ_DUMP(1)
  • #pragma attol insert printf("END -- TESTRT DUMP \n");

2) 내가 직접 덤프함수를 호출하는 방식으로 TESTRT INSTRUMENTER를 실행하지 않는 소스코드에 삽입을 해야 할때 사용할 수 있는 방식입니다.
(보통 링크시점에 INSTRUMENTER는 TP.c[pp]를 컴파일하고 TP.o (_atl_obstools_dump 정의)를 링크합니다.)
  • extern void _atl_obstools_dump(int);
  • _atl_obstools_dump(1);

TESTRT - 시스템헤더 제외 INSTRUMENT 옵션

You can either use the --sys_include=<dir> in the TDP  if the file is a system or third party include file. (atl.out 파일에 추가됨)

  • Basic Settings에 STD_INCLUDE에 추가하는 방법
  • Parser Settings의 Analyzer file configuration에 추가하는 방법
  • (TDP수정없이) atl.out에 직접 추가하는 방법 (TDP 수정시 제거됨)

Or you can use the option -noinstrdir=<dir> to exclude all the files in a particular directory.

Or you can use the option -EXFILE=<file> to exclude one particular file.

Multi-threaded options in for Runtime Analysis and Component Testing
  • Use the option, --no_sys_include, if the application includes system files, such as windows.h or pthread.h.

2011년 12월 5일 월요일

SCM - 체크인 히스토리(check-in history) 체인지셋 히스토리

RTC 3.x가 체인지셋 히스토리(change-set history)를 개발자에게 제공하였다면, RTC 4.0에서 부터는 추가적으로 체크인 히스토리(check-in history)를 개발자에게 제공합니다.

- 개발자는 동일한 체인지셋에 체크인을 여러번 하면서 버전 관리를 할 수 있습니다.
- 즉 기존의 체인지셋 단위 버전 불러보기(load) 보다 세밀하게 하나의 체인지셋에 여러번 체크인한 경우, 체크인 버전별로 파일을 불러올(load) 수 있습니다.

Check-in History shows a file was checked-in multiple times before the change set was completed

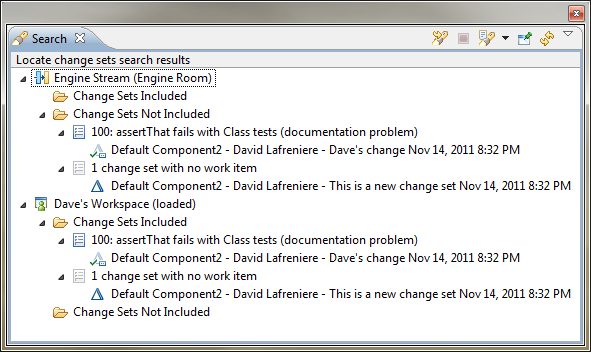
SCM - 결함이 반영되었는 지 검색(locate a change set)

1. 결함을 fix한 change set이 결함에 링크되어 있는 경우에 결함으로 부터 locate a change set를 실행합니다.

Locate change sets action is now available for a work item

2. 해당 결함이 여러개의 change set과 결함 하위에 여러 타스크 작업이 있는 경우에는, 검색할 change set를 선택합니다.

2 streams don't contain the changes, one stream contains some of them

3. 이제는 결함에 관련된 change set이 반영되었는 지 검색 대상을 지정합니다. 스트림이 주 타겟이 될 수 있습니다. 즉 릴리즈 3.0 스트림에 반영되었는 지, 릴리즈 2.1 릴리즈 2.2 등에 백포팅되었는 지 등을 알아보기 위해 해당 스트림을 검색 대상으로 지정합니다.

Hierarchical view

4. 검색결과를 통해 반영된 change set과 반영되지 않은 change set를 살펴보고 조치를 취합니다.

search_view.png

작업항목 속성사용자정의

https://jazz.net/library/article/537


This article describes the possibilities of customizing attributes with default values, dependent value sets, validation rules and dynamic required attributes. You should be familiar with work item customization already. If not, please read Work Item Customization and Work Item Editor Presentations first. The functionality shown here applies to both the Web UI and the Eclipse UI.

Overview

An early preview of attribute customization was made available in RTC 2.0.0.2. In 3.0 the functionality has been extended and is now configurable in the Process Configuration UI of the Eclipse client. Default values, value sets and validation rules are managed in the Attribute Customizationsection of the Project Area Editor. Once you have defined them there, you have the option to associate e.g. a value set with custom or built-in attributes. Required attributes can be configured in the Operation Behavior section of Team Configuration and, since 3.0.1, computed dynamically for values of other attributes using a Condition.

작업항목 사용자정의

https://jazz.net/library/article/129


The Work Item component can be customized in various ways. These customizations are configured on the Process Configuration page of the Project Area or Project Template editor. This article covers both RTC 1.0 and RTC 2.0. The screen captures are from RTC 2.0 but they still apply to RTC 1.0 since the UI hasn't changed much in RTC 2.0.
Work item customization in the Process Configuration in RTC 2.0

작업항목 스크립트기반 사용자정의

https://jazz.net/wiki/bin/view/Main/AttributeCustomization


dojo.provide("org.example.workitems.providers.SeverityTagValueSet");

dojo.require("com.ibm.team.workitem.api.common.WorkItemAttributes");
dojo.require("dojo.string");

(function() {
var WorkItemAttributes= com.ibm.team.workitem.api.common.WorkItemAttributes;

dojo.declare("org.example.workitems.providers.SeverityTagValueSet", null, {

    getValueSet: function(attributeId, workItem, configuration) {
    
        var tags= workItem.getValue(WorkItemAttributes.TAGS);
        var severityOptions= [];
        
        if (tags.indexOf("important") === -1) {
            severityOptions.push("severity.literal.l1"); // Unclassified
            severityOptions.push("severity.literal.l2"); // Minor
            severityOptions.push("severity.literal.l3"); // Normal
        }
        
        severityOptions.push("severity.literal.l4"); // Major
        severityOptions.push("severity.literal.l5"); // Critical
        severityOptions.push("severity.literal.l6"); // Blocker

        return severityOptions;
    }
});
})();


Attribute customization is a way to add additional behavior for an attribute of a work item. For example you might want to validate the value of an attribute or even calculate its value based on other attributes. This article discusses in detail all available types of attribute customization. The examples on this page have been developed and tested with RTC version 3.0.1.


This Wiki page is not a tutorial and is meant to serve as a reference. Please see Customizing attributes in RTC 3.0 for a step-by-step introduction on attribute customization where the general concepts are explained and a few examples are provided. Here you can find more details about each possible customization together with further examples. This Wiki also contains information about using scripts to achieve more advanced behavior.

작업항목 속성사용자정의 - DataSourceValueSet

https://jazz.net/wiki/bin/view/Main/DataSourceValueSetProviders

Since version 3.0.1.1 and 3.5 it is possible to configure a Value Set customization that fetches the values for an attribute using an external data source such as an HTTP Rest request that fetches XML data.


작업항목 스크립트기반 사용자정의 중급예제 - HttpFilteredValueSet


RTC 3.0.1.1에서 car, area 속성간의 의존성을 구현하는 방법입니다.

1. 자바스크립트를 첨부하여 customization하도록 CCM 서버를 구성합니다.

  • Go to administrative page of your RTC server https://your.server.name:9443/ccm/admin.
  • Open the Server tab.
  • From the left side-bar open Configuration > Advanced Properties
  • In the Work Item Component find the Enable Process Attachment Scripts property and set its value to true.

2. XML문서를 제공하는 서블릿을 구성합니다.
예: http://localhost:8080/MyCar/mycar (mycar.java)
protected void doMyCar(HttpServletRequest request, HttpServletResponse response) throws ServletException, IOException {
// Build the HTML response
        response.setContentType("text/xml;charset=UTF-8");
        PrintWriter out = response.getWriter();
        out.println("");
        out.println("");
        out.println("1");
        out.println("Acura");
        out.println("Acura1Acura2");
        out.println("
");
        out.println("");
        out.println("2");
        out.println("Aixam");
        out.println("Aixam1Aixam2");
        out.println("
");
        out.println("
");
        out.close();
}

3. 'car'용 value set provider를 만듭니다.
CarMakeProvider.png


4. 'car' 속성에 value set provider를 설정합니다.
car-valueset.png


5. 'area'용 value set provider 자바스크립트를 작성합니다.
예: MyCarAreaValueSet.js (MyCarAreaValueSet.js)
dojo.provide("org.example.workitems.providers.MyCarAreaValueSet");
dojo.require("com.ibm.team.workitem.api.common.connectors.HttpConnectorParameters");
(function() {
var HttpConnectorParameters= com.ibm.team.workitem.api.common.connectors.HttpConnectorParameters;
dojo.declare("org.example.workitems.providers.MyCarAreaValueSet", null, {
    getFilteredValueSet: function(attributeId, workItem, context, filter) {
        var params= new HttpConnectorParameters();
        var car = workItem.getValue("car");
        var xpath = "//xml/node[make=\"" + car + "\"]/areas/area";
        params.url= "http://localhost:8080/MyCar/mycar";
        params.xpath= xpath;
        params.columnXpaths= ["./name"];
        params.columnIds= ["Area"];
       
        var connector = context.getDataConnector("HttpConnector");
        var values= connector.get(params);
       
        var result= [];
        while(values.hasNext()){
            var entry= values.next();
            var area= entry.getById("Area");
            result.push(area);
        }
        return result;
    }
});
})();

6. 'area'용 value set provider를 만듭니다.
예: MyCarAreaValueSet
MyCarAreaValueSet.png

7. 'area' 속성에 'MyCarAreaValueSet'을 설정합니다.

작업항목 속성사용자정의 중급예제 - HttpFilteredValueSet


기본 예제가 하나의 속성을 다루었다면, 여기서는 두 속성 간에 의존 관계를 다룹니다.

1. car 속성은 기본 예제와 같이 설정합니다.
(1) CarValueSetProvider
- XML DataSource URL : http://localhost:8080/MyCar/mycar
- Row XPath Expression : //xml/node
- Col XPath Expressions : ./make
- Col identifiers : Make
- Entry label format : ${0} 

2. area 속성은 기본 예제와 같지만 car 속성에 의존적으로 설정합니다.
- XML DataSource URL : http://localhost:8080/MyCar/mycar
- Row XPath Expression : //xml/node[make='${car.value}']/areas/area
- Col XPath Expressions : ./name
- Col identifiers : Area
- Entry label format : ${0} 

3. 서블릿에서 제공하는 XML은 아래와 같습니다.

1
Acura

Acura1
Acura2 


2
Aixam

Aixam1
Aixam2 


작업항목 속성사용자정의 기본예제 - HttpFilteredValueSet

1. 먼저 서블릿(MyCar.zip)을 하나 만듭니다. 여기서는 시간상 데이터베이스에서 읽어서 XML를 만들지 않고 하드코딩한 XML를 던지도록 작성했습니다.

    protected void doGet(HttpServletRequest request, HttpServletResponse response) throws ServletException, IOException {
        doMyCar(request,response);    }

    protected void doPost(HttpServletRequest request, HttpServletResponse response) throws ServletException, IOException {
        doMyCar(request,response);    }

    protected void doMyCar(HttpServletRequest request, HttpServletResponse response) throws ServletException, IOException {
        // Build the HTML response
        response.setContentType("text/xml;charset=UTF-8");
        PrintWriter out = response.getWriter();
        out.println("");
        out.println("");
        out.println("1");
        out.println("Acura");
        out.println(",1,2,");
        out.println("
");
        out.println("");
        out.println("2");
        out.println("Aixam");
        out.println(",2,");
        out.println("
");
        out.println("
");
        out.close();

    }

화면상에서는 아래와 같이 서블릿을 호출하면 호출자에게 XML를 던집니다.

mycar-servlet.png


2. RTC 프로젝트 영역에 todo 작업항목 유형을 만들고 car 속성을 추가하여 테스트 해 봤습니다
- todo 작업항목 유형 만들기
  * "car"라는 small string 유형의 속성을 추가해 봤습니다.  

- todo 워크플로우 만들기

- todo 프리젠테이션 만들기
  * "car" 속성에 해당하는 프리젠테이션을 추가해 줬습니다. Kind는 Value Set Combo 또는 Value Set Picker를 사용해야 합니다.
car-presentation.png

- 속성 사용자 정의에 "CarMakeProvider"라는 Value Set 구성을 추가해 줍니다.
Category는 HTTP Filtered Value Set를 사용하고.. 아래와 같이 configuration을 해줍니다.

참고로 서블릿이 던지는 XML 문서 포맷을 다시 싣습니다.
- <xml>
-   <node>
        <id>1id>
        <make>Acuramake>
        <regions>,1,2,regions>
  node>
-    <node>
        <id>2id>
        <make>Aixammake>
        <regions>,2,regions>
  node>
xml>

CarMakeProvider.png
- "car" 속성에 Value Set를 "CarMakeProvider"로 지정해 줍니다.
car-valueset.png

3. todo 작업항목을 하나 만들어 봅니다.
todo-car.png

Jazz - 저장소 권한

출처 : http://publib.boulder.ibm.com/infocenter/clmhelp/v3r0m1/index.jsp?topic=%2Fcom.ibm.jazz.platform.doc%2Ftopics%2Fc_permissions.html


JazzGuests JazzUsers JazzDWAdmins JazzProjectAdmins JazzAdmins
Read access to repository Yes Yes Yes Yes Yes
Write access to repository Yes Yes Yes Yes
Control the data warehouse Yes Yes
Create and modify process templates Yes Yes
Create project areas Yes Yes
Modify access control settings for project areas Yes Yes
Save project areas Yes Yes
Generate team member invitations Yes Yes
Create users Yes
Configure the server Yes


주: 각 프로젝트 영역은 해당 액세스 제어 설정을 통해 특정 사용자에 대한 읽기 액세스를 제한할 수 있습니다. 최소한 JazzUsers 저장소 그룹 권한이 있고 프로젝트 영역에 대한 읽기 액세스 권한이 있는 사용자는 해당 프로젝트 영역 내에서 자신에게 지정된 역할에 주어진 조치를 수행할 수 있습니다. 역할 기반 권한 목록은 표의 내용을 참조하십시오. JazzProjectAdmins 사용자는 프로젝트 영역의 역할 권한 설정에 관계없이 프로젝트 영역을 저장할 수 있습니다. 여기에는 팀 구성원 초대장을 생성하는 권한이 포함됩니다. 이 대체 기능은 사용자에게 읽기 액세스 권한이 없는 프로젝트 영역으로 확장되지 않습니다.

팁: JazzProjectAdmins 권한은 프로젝트 영역을 작성해야 하는 사용자를 위해 작성된 것입니다. 프로젝트 영역의 리더는 해당 프로젝트 영역을 관리하기 위해 JazzProjectAdmins 권한이 필요하지 않습니다. 프로젝트 영역 내에서 관리자로 지정된 사용자는 해당 프로젝트 영역에 대한 읽기/쓰기 액세스 권한을 가지고 있습니다.