레이블이 eclipse인 게시물을 표시합니다. 모든 게시물 표시

2011년 12월 18일 일요일

이클립스 업데이트 사이트

참고 : http://wiki.eclipse.org/Eclipse_Project_Update_Sites
참고 : http://wiki.eclipse.org/Older_Versions_Of_Eclipse
  • Galileo(3.5.2) 원격 업데이트 사이트 : http://download.eclipse.org/releases/galileo


CCRC - RTC 이클립스 쉘 공유 조합

아래 조합별 성공 여부를 확인하실 수 있습니다.

1.     IIM install of RTC + IIM install of CCRC -> works;
2      IIM install of "CC synchronizer and RTC client" + Install of CCRC from update site -> works;
3.    Zip install of RTC or CCsynchronizer  + Install of CCRC from update site  -> does not work;


IIM install of CCRC을 위한
Download location of the CCRC Extension for version 7.1.1 and 7.1.2
https://www-304.ibm.com/support/docview.wss?uid=swg21431506

2011년 11월 30일 수요일

JFace 개발 샘플


JFace를 위해 buildpath 설정
org.eclipse.jface
org.eclipse.core.commands
org.eclipse.equinox.common
org.eclipse.swt 
JFace.png


SWT Widget Sample Screen shots

SWT Widgets
Below are screenshots and links to documentation for many of the widgets included in SWT. For a complete list of classes including those that don't screenshot well, see the SWT Javadoc.

SWT Part 4 - How to use ToolBars and SashForms


In the previous three installments of this series, I introduced you to Eclipse, the Eclipse Standard Widget Toolkit (SWT), and the JFace GUI tool kits used to construct Eclipse and standalone rich GUIs. I also introduced many of the basic GUI controls, container types, and layout managers. I then I showed you how you can combine these controls into simple working applications. I also detailed how you can provide those applications with a menu system. Finally, I demonstrated how you can follow best practice by creating a library of methods and classes to ease GUI development.
Here, we complete our survey of the various widgets in the org.eclipse.swt.widgets and org.eclipse.swt.custom packages (unless otherwise noted, the controls I discuss are in the widgets package). For background, it is assumed you have read at least the first installment of this series, "How to create a simple SWT application."

Introduction

I will discuss several GUI controls in the following sections. These controls are demonstrated by a single application program called BarApp. As in earlier installments, BarApp is an extension of the BasicApplication class where the control creation methods exist. Several screenshots of this application will be used to show the features of the different controls.
Figure 1 below shows all the controls we will discuss, including several ToolBars and a CoolBar. At the extreme left are three bordered Composites (containing a Label) -- each of which is inside a pane of a SashForm. This SashForm is itself inside a bordered Composite in a larger SashForm. Near the middle left is a vertical ToolBar with the Open Tracker button at the top. On the top right are four horizontal ToolBars (inside two CBanners) -- of which only two can be seen; the first two use text labels, the second two use images (the same one). All of the ToolBars and CBanners are inside a single Composite in the outer SashForm. This structure can best be seen by the control hierarchy shown in Listing 1.


Figure 1. BarApp example
BarApp example
 http://www.ibm.com/developerworks/opensource/library/os-jface4/index.html

SWT Part 3 - How to use TabFolder, Canvas, and StyledText


In the previous two installments of A gentle introduction to SWT and JFace, I introduced you to Eclipse, the Eclipse Standard Widget Toolkit (SWT) and the JFace GUI tool kits used to construct Eclipse and stand-alone rich GUIs. I also introduced the several basic GUI controls and container types. Then I showed how to combine these controls into simple working applications. I detailed how to provide those applications with a menu system. Finally, I demonstrated how you can follow best practice by creating a library of methods and classes to ease GUI development.
Here, I continue my survey of the various widgets in the org.eclipse.swt.custom and org.eclipse.swt.widgets packages. Unless otherwise noted, the controls I discuss are in the widgets package.

TableTree

In the previous installment, "How to use combo, list, table, and tree controls," I described the Tree and Table controls. SWT supports a hybrid version of these controls, in the custom package, called TableTree. In Eclipse V3.1, the Tree control was enhanced to be a functional replacement for TableTree, and TableTree was deprecated. Figure 1 shows an example Tree in tabular format (TableTree emulation mode). As you can see, each item in the tree is divided into columns. As the creation of both tables and trees were shown previously, and creating a tabular Tree is basically a combination of these two tasks, I will not repeat them here. The Tree sample included with this article demonstrates the creation of a tabular Tree. The code for creating a TableTree is very similar to the code I include for Tree, so if you need support for older versions of Eclipse, you can use the TableTree control.

Figure 1. Tabular Tree Example
Tabular Tree showing four members of a family and another person
The rest of this article will demonstrate the use of many new SWT controls. I will do this in the context of a single application called TabFolder1App.


SWT Part 2 - How to use combo, list, table, and tree controls


Programmers use the Standard Widget Toolkit (SWT) and JFace libraries to develop graphical user interfaces (GUIs) for the Eclipse environment, and to develop stand-alone GUI native applications.
In the first installment of this series, "How to create a simple SWT application," I introduced you to Eclipse, the Eclipse SWT, and the JFace GUI tool kits to construct Eclipse and stand-alone rich GUIs. I also introduced the basic label, text, and button GUI controls, and the composite, group, and shell container types. Finally, I showed you how to combine these controls into a simple working application.
Here, you will learn how to add menus to your application, use some list input controls, and use the more advanced table and tree container controls. I also will demonstrate some best practices by employing service methods to easily build GUIs. Finally, I will show you how to extract reusable function into a base application class.
Except where noted, all the widgets and controls discussed are in the org.eclipse.swt.widgets package.

Menus

All but the most primitive GUI applications require menus. Menus add to any GUI's usability. Menus are dynamically presented selection lists that correspond to functions available for use (often called commands) or GUI states. As you would expect, you create menus with the menu widget. Menus can contain other menus or menuItems, which can contain menus (that is, a hierarchy of menus). MenuItems represent the commands you can perform or the GUI state you selected. Menus can be associated with the application's (that is, shell) menu bar or they can be pop-up menus that float over the application window.
You must define menus as one of three mutually exclusive styles:
  1. BAR acts as the menu bar for the shell
  2. DROP_DOWN drops down from the menu bar or a menu item
  3. POP_UP pops up from the shell, but is contextual to a specific control
Menus support some additional optional styles:
  • NO_RADIO_GROUP does not act as a radio group; use it when the menu contains RADIO-style items
  • LEFT_TO_RIGHT or RIGHT_TO_LEFT selects the text direction
You must define menuItems as one of five mutually exclusive styles:
  1. CHECK can be persistently selected (that is, checked)
  2. CASCADE contains a menu that should drop down
  3. PUSH acts like a button that causes an immediate action
  4. RADIO acts like a CHECK where only one of the items with this type can be selected
  5. SEPARATOR acts as a separator (often a bar) between groups of items; this item has no function
Creating a menu system is fairly complex. Listing 1 shows a code sample that creates an operable menu system.

 http://www.ibm.com/developerworks/library/os-jface2/index.html

SWT Part 1 - How to create a simple SWT application


The Standard Widget Toolkit (SWT) and JFace libraries are used to develop graphical user interfaces (GUIs) for the Eclipse environment, and also to develop stand-alone GUI native applications. In this article, I introduce some of the basic SWT (the name for the basic GUI object) types and show how to combine them to create a working application.

About Eclipse, SWT, and JFace

As noted on the Eclipse Web site, Eclipse is a kind of universal tool platform. It's an open, extensible IDE for anything and nothing in particular, and provides tool developers with flexibility and control over their software technologies.
Eclipse provides a base for developers to produce rich GUI-driven tools and applications. Fundamental to this capability are the Eclipse GUI libraries SWT and JFace.
SWT is a library that creates a Java view of the native host operating system GUI controls. It is host implementation-dependent. This means SWT-based applications have several key characteristics:
  1. They look, act, and perform like "native" applications.
  2. The widgets provided reflect the widgets (the components and controls) provided on the host operating system.
  3. Any special behavior of the host GUI libraries is reflected in SWT GUIs.
These goals make SWT different from Java technology's Swing, which was designed to hide operating system differences.
The SWT library reflects the basic widgets of the host operating system. In many circumstances, this approach is too low-level. The JFace library helps by adding many services to SWT applications. JFace does not hide SWT; it just extends it. As you will see later in this series, one of its most important extensions is to isolate the application's data model from the GUI that displays and changes it.

Eclipse SWT 도움말 및 샘플

이클립스에서 제공하는 SWT 라이브러리를 사용하실 경우...

이클립스 SWT 홈 : http://www.eclipse.org/swt/
- 코드 샘플 (SWT snippets) : http://www.eclipse.org/swt/snippets/

SWT org.eclipse.swt.widgets 라이브러리 도움말 사이트 (Tree 뷰를 통합 접근 방법)
- http://help.eclipse.org/helios/topic/org.eclipse.platform.doc.isv/reference/api/org/eclipse/swt/widgets/package-tree.html

그외 코드 샘플 사이트
- http://www.java2s.com/Code/Java/SWT-JFace-Eclipse/CatalogSWT-JFace-Eclipse.htm

참고> java.util 라이브러리 도움말 사이트
Java 6 - http://download.oracle.com/javase/6/docs/api/java/util/package-tree.html
Java 5 - http://download.oracle.com/javase/1.5.0/docs/api/java/util/package-tree.html

참고> 샘플 코드 사용시

RTC 클라이언트 zip이 풀려 있는 경우
샘플 코드 테스트용 프로젝트의 Java Build Path에 Add External Jars를 추가해 줍니다.
위치는 \jazz\client\eclipse\plugins\org.eclipse.swt.win32.win32.x86_3.5.2.v3557f.jar

Eclipse + CC/CQ V7.1.2 플러그인 설치

Eclipse 버전을 다운로드 받아서 설치할 때 필요한 EMF, GEF, BIRT, TPTP 등 플러그인은 각각 아래 도움말을 통해 확인할 수 있습니다.

CQ client 플러그인 설치 도움말 : http://publib.boulder.ibm.com/infocenter/cqhelp/v7r1m2/index.jsp?topic=/com.ibm.rational.clearquest.install_upgrade.doc/topics/c_postinstall_eclipse.htm
(on Eclipse version 3.2.x, 3.3.x, 3.4.x, and 3.5.x)

CQ designer 플러그인 설치 도움말 : http://publib.boulder.ibm.com/infocenter/cqhelp/v7r1m2/index.jsp?topic=/com.ibm.rational.clearquest.install_upgrade.doc/topics/c_postinstall_designer.htm

CCRC 플러그인 설치 도움말 :
1. http:///ccrc/update (on Eclipse version 3.2.x, 3.3.x, 3.4, 3.5, and 3.5)
2.http://publib.boulder.ibm.com/infocenter/cchelp/v7r1m2/topic/com.ibm.rational.clearcase.cc_ms_install.doc/topics/c_inst_ccrc_eclipse.htm

CC SCM Adaptor 설치 도움말 : http://jazz.net/library/article/579

CC 플러그인 사용 도움말 : https://www-304.ibm.com/support/docview.wss?rs=2044&uid=swg21252464

2011년 11월 29일 화요일

Eclipse 3.7.1에 RTC 3.0.1 설치 (p2 방식)


작업절차는 아래와 같습니다.

1. Eclipse 3.7.1 SDK 다운로드 및 설치(압축풀기)
2. 301p2RepoClientPatch.zip 다운로드 및 Eclipse의 archive update site로 지정
3. RTC-Client-p2Repo-3.0.1.zip 다운로드 및 압축풀기 그 후 Eclipse의 local update site로 지정
4. Eclipse에서 Install New Software 수행
(1) archive update site 선택 후
(2) RTC Eclipse Client Feature only 선택
(3) 설치 진행
5. Eclipse 재시작

그리고 RTC 3.0.1.1 서버는 RTC 3.0.1 클라이언트와 동작하므로 위와 같은 셋업은 사용가능할 것으로 봅니다.


출처 : https://jazz.net/jazz/web/projects/Rational%20Team%20Concert#action=com.ibm.team.workitem.viewWorkItem&id=168507

RTC Eclipse에 Web 개발도구 설치


1. 먼저 Preferences->install/update->available update sites에
http://download.eclipse.org/releases/galileo 를 추가합니다.

2. 다음 Help->install new software..를 누르고 위에서 추가한 사이트를 선택합니다.

3. Web 개발 도구를 선택하여 설치합니다.

2011년 11월 20일 일요일

SCM - 이클립스 로컬 히스토리 개발작업 백업

이클립스에는 파일/폴더를 저장, 삭제할 때, 이전 버전 정보를 이클립스 로컬 히스토리에 저장합니다.
-- RTC 소스제어시에도 해당됨(ex, Load, Accept, Suspend, Resume, Discard, Undo)

즉 RTC를 이용한 버전 이력과 별도로 이클립스 자체적으로 히스토리를 관리하고 있어서,
그날 중간 중간 바꾼 내용을 되살리거나 다시 보고자 할때 편리하게 사용할 수 있습니다.

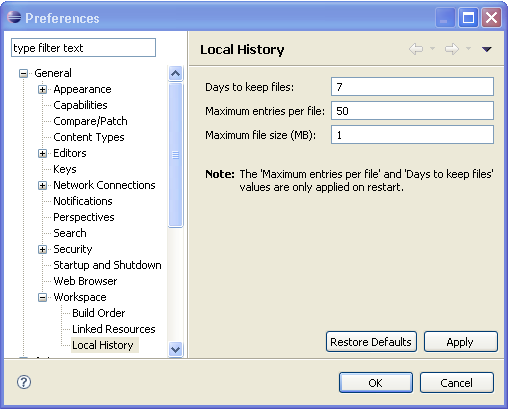
(1) 이클립스 로컬 히스토리 환경 설정


(2) 이클립스 로컬 히스토리의 이전 버전과 비교


(3) 이클립스 로컬 히스토리 버전으로 복원


SCM - 이클립스 상의 파일 UTF-8 인코딩 설정

In the eclipse IDE the default encoding can (and must) be set to UTF-8. This can be done under Window | Preferences | General | Workspace | Text file encoding


Additionally, there are file-type specific settings under Window | Preferences | General | Content Types


The encoding of a newly created file, of course, may be defined here: Window | Preferences | Web and XML | ... files
where you have to set the file encoding for each kind of file separately.


In addition, eclipse should be started given UTF-8 as default encoding. This can be done with an additional startup property in the eclipse.ini file:

add -Dfile.encoding=UTF-8 at the end of eclipse.ini.


참고: 커맨드(iconv)를 이용한 파일 인코딩 변환방법 (Linux/Unix)

사용방법
$ iconv [옵션] [원본파일]
옵션:
-f 원본파일의 인코딩 방식
-t 콘솔출력의 인코딩 방식

변환 예 EUC-KR 인코딩 파일을 UTF8로 변환하기
$ iconv -f EUC-KR -t UTF8 test_euc_kr.txt > test_utf.txt


This is also useful when launching applications from eclipse. Add the above parameter to the arguments: Run| Run Configurations| Arguments | VM Arguments